
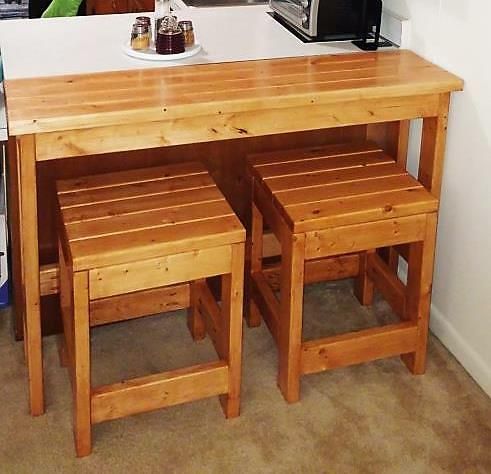
Day 23 - let's get started! You can see links to the complete series here, and get details about my Lowe's gift card giveaway here. In this series, we're seeing what we can make out of 2x4s. I want to keep it cheap, keep it easy, and keep it totally doable for anyone. Remember earlier this month when we built a simple chair? Today we're tackling something similar - a chunky bar stool!
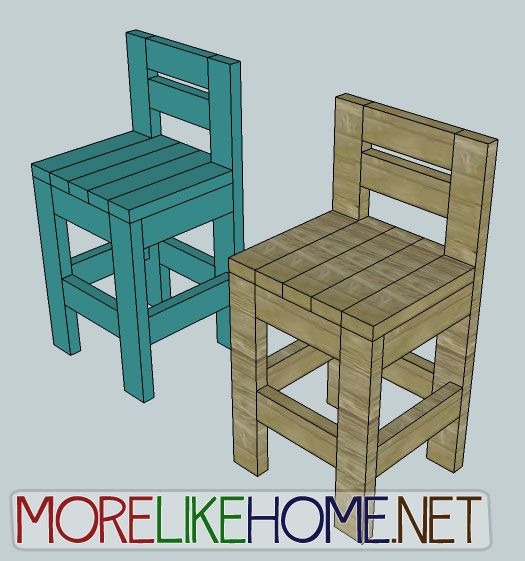
These bar stools are super sturdy and durable. Pull a couple up to your kitchen island for extra seating. The low back is unobtrusive while still giving some support and security, especially for kids! Let's build one!
Shopping List:
2 - 2x4s @ 10'
long
1 - 2x4 @ 8' long
Tools:
Saw
Drill
2 1/2” screws (or Kreg Jig
& 2 1/2" self tapping screws)
4" screws (or Kreg Jig
& 2 1/2" self tapping screws)
Wood glue
Wood filler
2x4 Cut List:
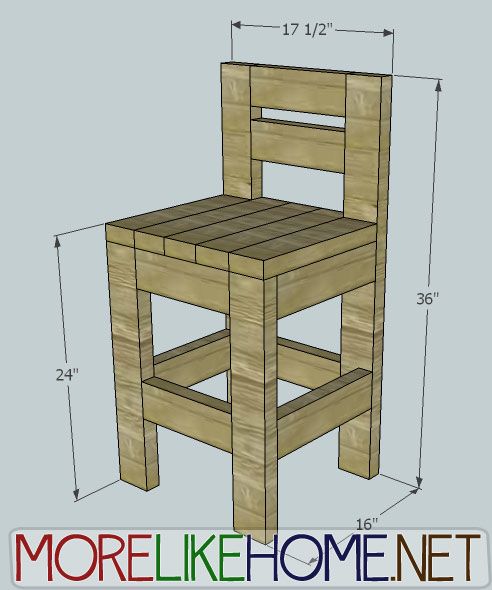
(A) - 2 @ 36" (back legs)
(B) - 2 @ 22 1/2" (front legs)
(B) - 2 @ 22 1/2" (front legs)
(C) - 6 @ 10 1/2" (back/front boards)
(D) - 4 @ 13" (sides)
(E) - 1 @ 14 1/2" (seat support) OR a few scraps cut at 45 degree angles
(F) - 3 @ 16" (seat center)
(G) - 2 @ 14 1/2" (seat sides)
(G) - 2 @ 14 1/2" (seat sides)
Dimensions: 17 1/2" wide x
36" tall x 16" deep
Please read all the directions
before beginning, and cut your pieces as you go, measuring before each cut. Use
2 1/2” screws or pocket holes with 2 1/2" screws unless otherwise
indicated. Always use glue. Pre-drill and countersink your screws. I
have not built from these exact plans, so measure lots to make sure things work
out!
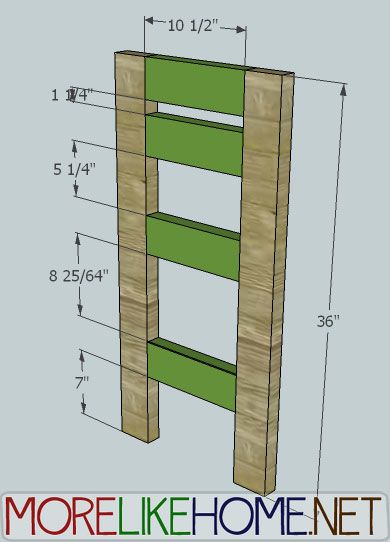
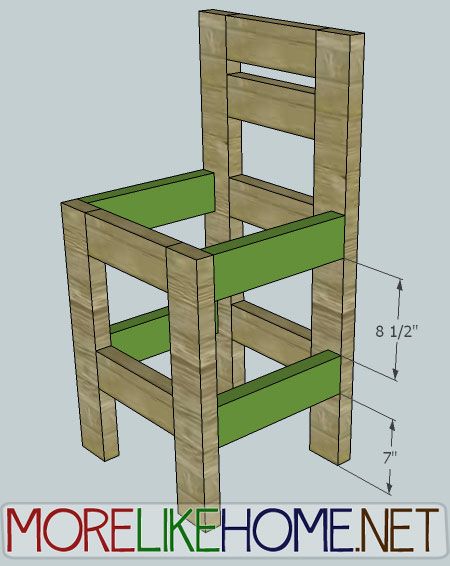
Step 1: Build the Back
Use four of the front/back boards (C) to connect the back legs (A) as shown below. The first board should be flush with the top of the legs, the next 1 1/4" down from that, the third 5 1/4" down from the second, and the fourth down 8 1/2" (**sketch up is acting weird, I can't figure out why it's showing a goofy number here. It should say 8 1/2". Sorry!**)from the third, leaving 7" below. Attach them using a Kreg Jig and pocket hole screws, or by drilling
through the legs into the front boards with 4" screws and glue.
Step 2: Build the Front
Use two more front/back boards (C) to connect the front legs (B). Attach the first front board flush with the top of the legs, and the second 8 1/2" below that (leaving 7" underneath). Attach them using a Kreg Jig and pocket hole screws, or by drilling through the legs into the front boards with 4" screws and glue.
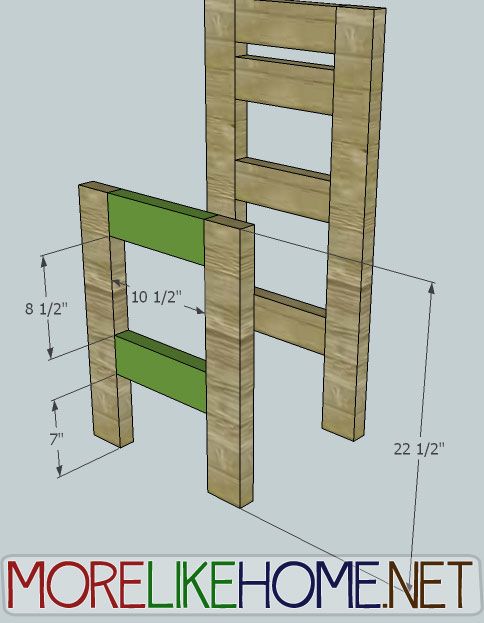
Step 3: The Sides
Now use the side boards (D) to connect the front and back sections. You will use two boards on each side of the stool and they should be flush with the outside edges of the legs. One should be flush with the top of the front legs and at the same height on the back leg, (the top should be 22 1/2" above the floor). The second board should be lined up with the bottom front/back boards with 7" underneath it. Attach them with a Kreg Jig or by drilling through the legs into the side boards with 2 1/2" screws and glue.
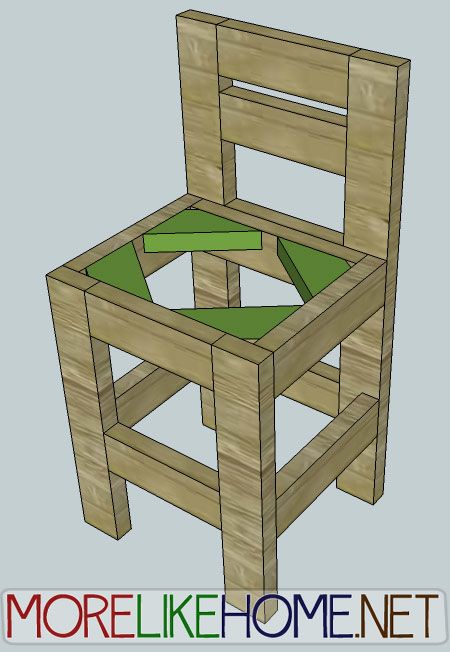
Step 4: The Seat
Start by putting in a seat support. There are a couple ways you can do this. The first is to put a support board (E) across the back of the seat opening. I didn't put one across the front because the seat boards will rest on the front board and legs which makes it quite sturdy. But if you want to be extra safe, you can! Attach these by drilling through the support into the back board and legs with 2 1/2" screws and glue.

Another option would be to cut four scrap boards at 45 degree angles and attach them into the corners of the seat opening.
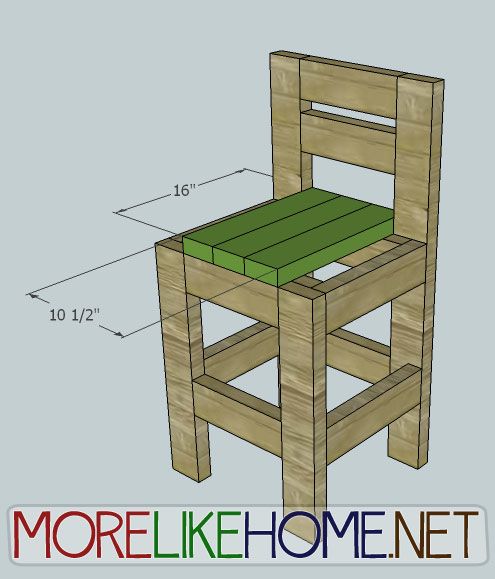
Now you can attach the seat boards. Start by installing the center seat boards (F). These should run between the back legs and be flush with the back edge of the back board (also flush on the front). Attach them by drilling down through the seat boards and into the front/back boards with 2 1/2" screws and glue.
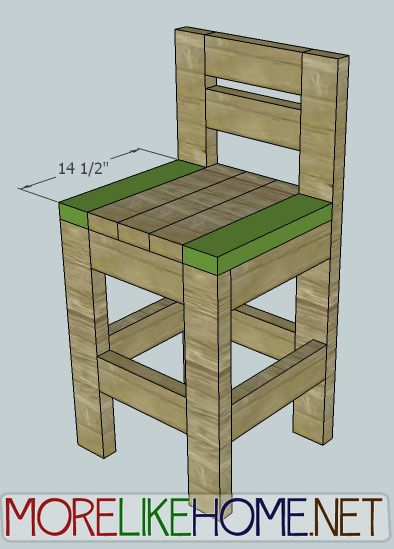
Now attach the seat side boards (G). The should sit against the center seat boards and back legs. They will be flush across the sides and front of the stool. Attach them in the same way as the center seat boards.
Step 5: Finishing
Start by filling any holes and sanding everything smooth. Then finish with any pain/stain/polyurethane you like! A rustic wood finish would be a nice contrast for a crisp white kitchen. Or you could add a splash of fun with a bright coat of paint. Maybe teal or light green? Have fun!
Project 2x4 Cost:
$6.40 - 2 2x4s @
10' long ($3.20 each)
$2.50 - 1
2x4 @ 8' long ($2.50 each)
$8.90 Total
See giveaway winners here.
I Did It!
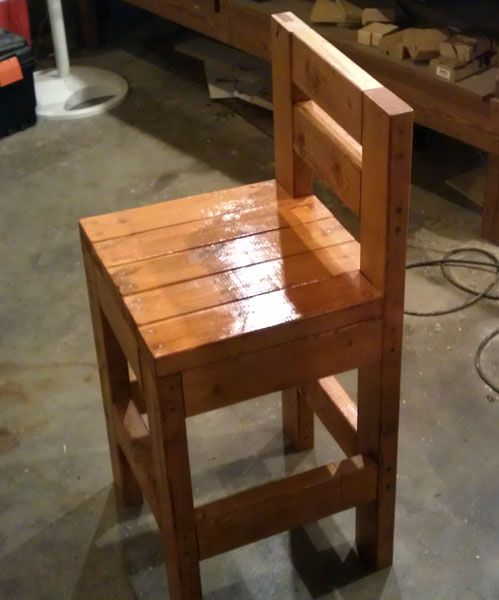
And a big thanks to Matt for sharing a pic of his finished bar stool! Great job!
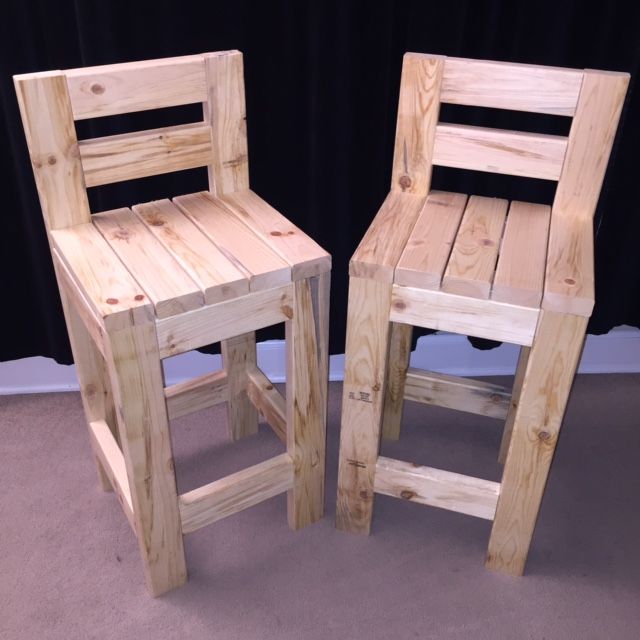
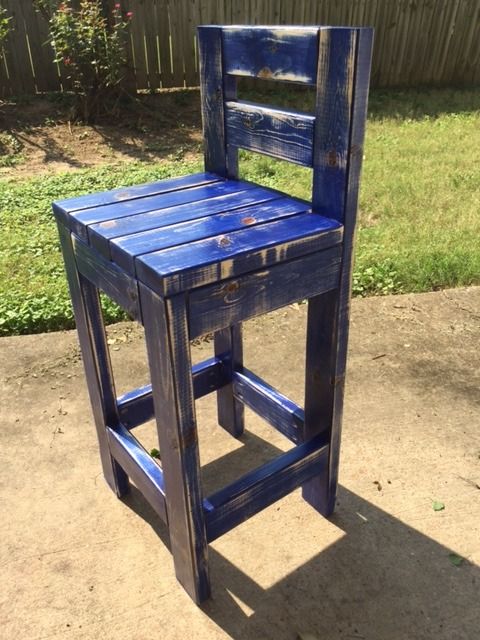
Rogers tackled two sets of bar stools that turned out beautiful. The second set is finished with distressed blue stain.
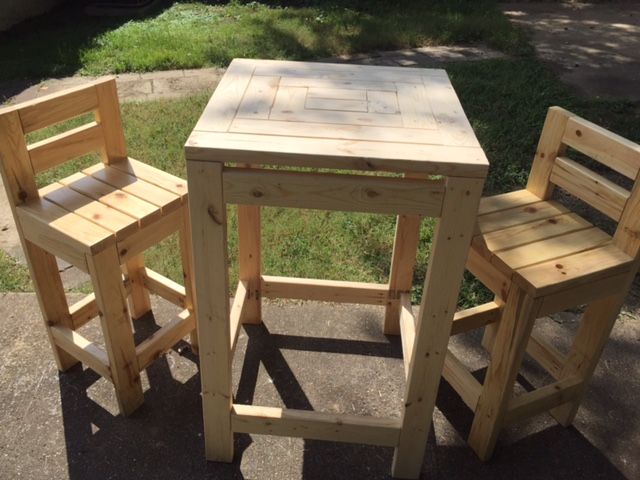
He also built a custom Pub table using the pattern from our Craftsman End Table plans. The top is 28x28" and the legs are 44" (but he plans to make the 42" next time).
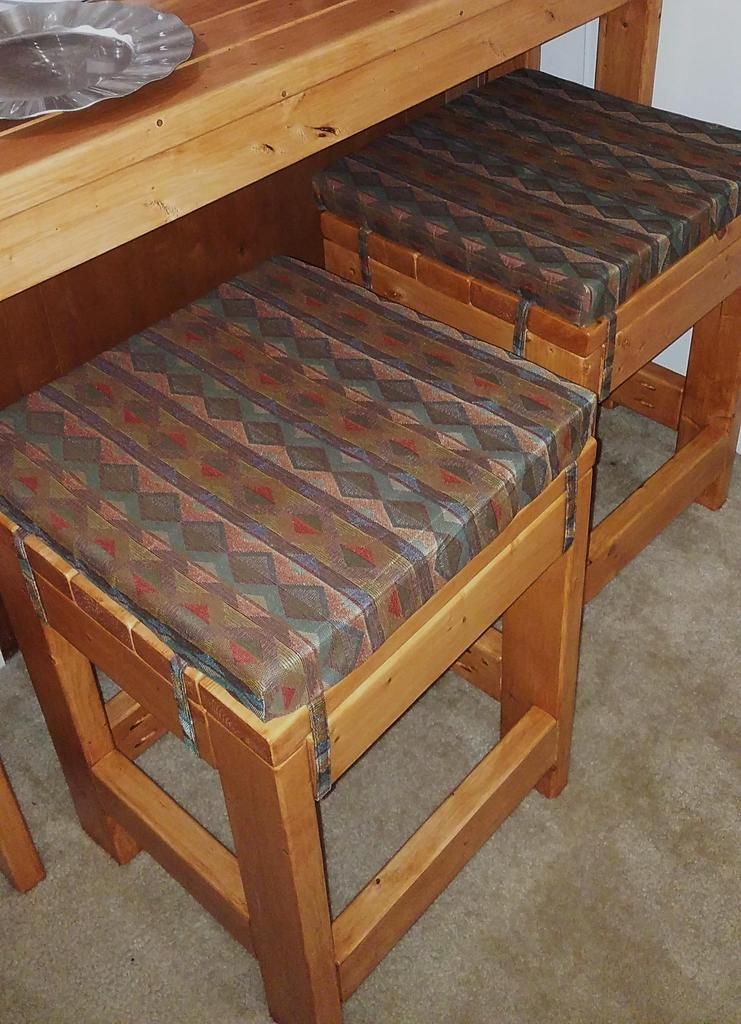
Pam modified the bar stool plans to create these backless stools. They work perfectly in an apartment without space for a full size table, and an added bonus is that guests can swivel around to face the living room. She put the lower side supports at two different heights which gives guests of different heights a comfy place to rest their feet. They also added removable cushions they made with 18x18" pieces of foam (secured with ties that run under the seat). The custom table was built by modifying the 2x4 desk plans from day 2!
Justin left his comfort zone and built this one...nice work!
(via beyondthebullingtons.com)

Share on Facebook

Finally, the bar stools! Been waiting for these! I am so glad I made myself wait instead buying them. Now I can make one for the price of three! Thanks!!
ReplyDeleteDid you mean 3 for the price of 1?
DeleteThese look so neat and something I could actually make :)
ReplyDeleteYes! We could use some spare bar stools around here.
ReplyDeleteI like the fact that I can adjust these (and the place to rest my feet) to fit my height!
ReplyDeleteMake these along with a table and I'll have a full set
ReplyDeleteNeed to make these! Bar stools are so expensive, and fall apart so easily!
ReplyDeleteI love that these look so good, but will keep kids safe.
ReplyDeleteJust made three of these just in time for Thanksgiving. Easy to put together and looks awesome. I love how sturdy they are.
ReplyDeleteThat's great! I'm glad you like them! I'd love to see pics if you have some. ;)
DeleteThis is awesome. This is a very good help when making extra tall bar stools. Thanks for posting.
ReplyDeleteWonderful! I have a bunch of 2x4s in the garage, now I can turn them into useful furniture. Also thanks for introducing me to pocket holes!
ReplyDeleteHere are the pictures: http://beyondthebullingtons.com/1/post/2013/07/baby-steps-woodworking-edition.html
ReplyDeleteSo...I know very little about woodworking. Actually, I know nothing. Short-sided, I really didn't care about a trade like this in Middle School and Highschool, so I spent most of my time playing basketball and PS3 with my friends. I sincerely regret not spending more time with my dad and soaking up his 30 years of construction experience. Oh yeah, shameless pitch------------> If you're around the Bureau County/Peoria/Chicago area and need work done, here's his website: http://www.bullington-isaacson.com
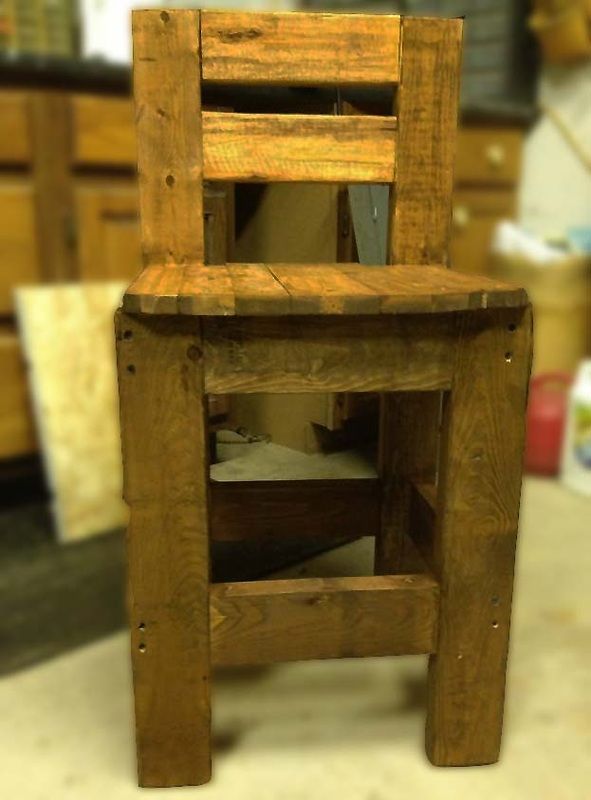
With living in a remote location on the horizon, this summer has been jam-packed with support raising and some practice building furniture. My dad has taken time to show me some helpful tricks and tips, and has given me the freedom to use all of his wood and power tools. I took a baby step, first building the step stool out of 2x4's - I don't recommend exclusively using 2x4's because it feels like its 40 lbs.
The next day, I found the plans for this chair and was definitely challenged. It took me 5 hours to put together, with an additional 2 hours of sanding and staining.
Yeah, 2x4's get heavy fast. :) Thanks for sharing, it looks great!!
DeleteThank you for the plans! I completed this over the weekend. Here is the finished product. I made it for use at the work bench in the garage.
ReplyDeletehttps://docs.google.com/file/d/0B3gzCJwNfqXSd08wUjBDTmNwRXM/edit?usp=sharing
This looks fantastic! Thanks so much for sharing, do you mind if I share your pic on the post?
DeleteFeel free! Thank you again!
DeleteSo I came across your website a while back and loved the 2x4 plans. I decided to finally get around to building the bar stool for my work bench. Obviously a bit modified from your plans, Just need to sand it down and put some poly on it and it'll be a great chair. Thanks again!
ReplyDeletehttps://drive.google.com/file/d/0By2-LyFEjUxrRGtUOXNvT25MOGc/edit?usp=sharing
Hmmm, this is saying I don't have permission to access the photo. Is there another link I could try? I would love to see how you modified it! :)
DeleteIs the wood list for one chair? My wife likes the plans, and I inevitably run back and forth to Home Depot for one thing or the other. Would like to keep the extra trips down! Thanks!
ReplyDeleteYes, the list makes one bar stool. Good luck! :)
DeleteWhat type of wood do you suggest using for this project?
ReplyDeleteWe used basic stud lumber because it's very affordable. You just have to check your boards to make sure they are straight before purchasing. :)
DeleteHi Georgia. These stools look fab and I'm going to give it a go :-). If I suceed at this I'd also love to make a bar/breakfast style table to match it. Ive seen that you've done lots of other types of tables but wondered if you have a plan/dimensions etc for a table to go with the bar stools? As small and compact as possible that 2 stools would fit under on both sides perhaps? It would make a beautiful set :-). I look forward to your reply- your work is fab!!
ReplyDeleteThanks! My craft table could be pretty easily modified to fit four bar stools - http://www.morelikehome.net/2012/10/day-30-build-2x4-craft-table.html
DeleteYou would just need to add 23" to all the length measurements, so the front/back boards would be 53" long and the top boards would be 62" long. Then add 6" to the legs, which would make them a total of 34.5" long.
Hope that helps! :)
Thank you for the plans! We had a few hiccups along the way, but the chairs now fit perfectly with the new high top my husband built for our deck. Looking forward to many summer days and nights on our new" patio.
ReplyDeleteI'm so glad! I'd love to see pics if you have any. :) Enjoy your patio!
DeleteHi I looked at your plans and I would need a little help with how to screw the pieces together. I saw the tools u use but this is my first ptoject.
ReplyDeleteI made one of these today out of some old 2x4s that I had laying around from another project. It turned out great! And now my son wants me to make a smaller one for him! Lol I'm just gonna shrink all the measurements by a few inches to make his and then make another one of the full size for myself!
ReplyDeleteThat's great! I hope your son enjoys it! :)
DeleteDo you have ideas on how to add cushion to the 2x4 bar stool? Since the seat is in several pieces I can't just ooo it off and upholster it. Any good suhgestions you may have?
ReplyDeleteI can't just pop*
DeleteI made the seat out of one piece of 3/4” plywood and upholstered it. I’d upload pictures but can’t figure out how. 🤔
DeleteHi! That sounds like a perfect solution. :) There's no way to upload photos to this post, but you're always welcome to share on our facebook page! facebook.com/morelikehome
DeleteWhat grit(s) do you recommend sanding the wood?
ReplyDeleteHi! I usually start with 60, then 120, then 220. :)
DeleteThank you for this. So much fun!
ReplyDeleteI am making my first one and am a little confused. I double checked all the measurements. Is the 10.5" piece at the top of the front legs supposed to line up flush with the 3rd 10.5" piece down on the back legs? Mine is a little off, just curious if I need to adjust before I move to the next step.
ReplyDeleteMade these this weekend with some slight size modifications to make them match some existing stools. Thanks for the plans and inspiration!
ReplyDelete