

Our biggest boy is really into Star Wars, which means our second boy also thinks it's the bees knees, and the little one wants whatever his big brothers have. And so I ended up making three sets!

But if the little guys should decide they aren't interested in Ewoks, the hood comes off to leave a fuzzy little bear. It took a few hours to make all three sets, but they were super affordable so it was worth the effort!

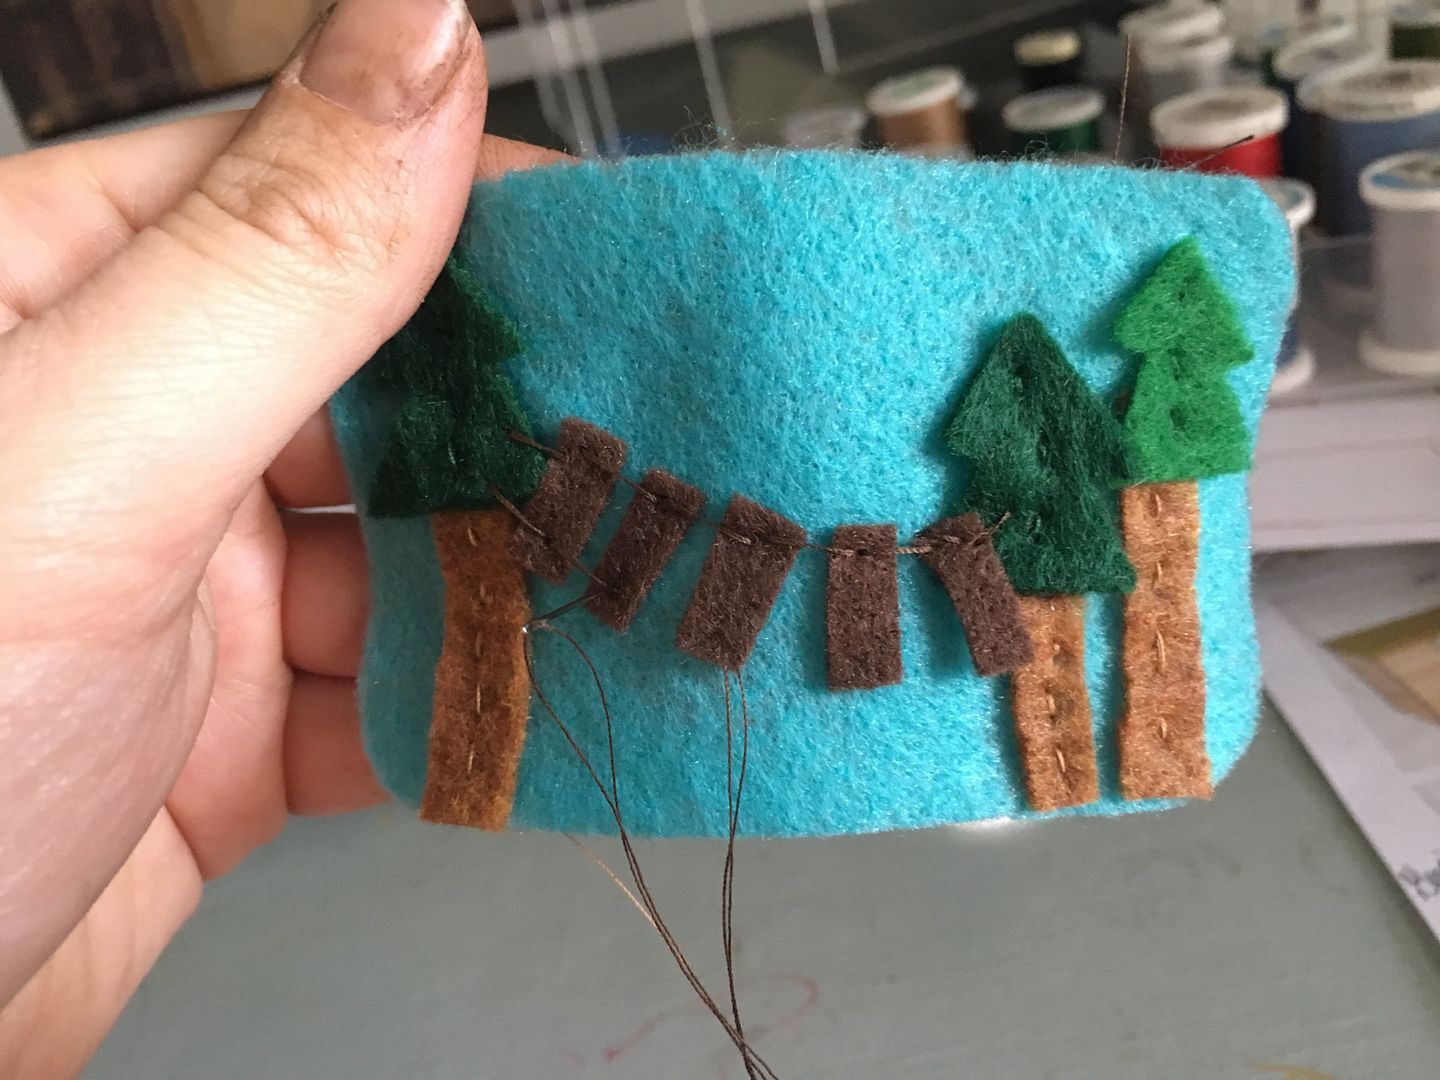
I put a rope bridge between the trees so it would look more like an Ewok village, but you can leave that out if you're going for a bear or other animal

You can find more of our DIY Christmas gift and decor ideas by clicking here:

I've seen several cute little felt playsets on etsy, but the price puts them out of our stocking budget (especially when I need three sets). Thank goodness for DIY! My bear is inspired by one bybido made for an altoid set using this mollie makes template. But I altered it to look more Ewok-ish so I'm including that in my printable pattern as well.

You can change the shape and placement of the ears to make all kinds of animals! Or make it all white for a polar bear or black and white for a panda bear.
Here's what I used to make mine (feel free to switch out any colors you want!):
- Altoid Tins - I ordered this set of 6 on Amazon for $11 and still have three left over
- Felt colors (usually about $0.25/sheet at craft stores):
- light blue - sky
- medium green - ground & tree tops
- dark green - tree tops
- medium brown - tree trunks, bear body
- light brown - bear accents
- dark brown - bridge
- dark gray - cave outside
- off-white - tent
- gray - blanket/mat
- whatever color you want for the hood - I used red, green, and blue
- matching thread - I used light brown, dark brown, green, off-white, and colors to match the hoods *note: I doubled up the thread for all the hand sewing.
- small piece of elastic (optional)
- black embroidery floss
- E600 glue
- the pattern
Next sew the tent to the tent back with off-white thread. If you end up with a little extra tent at the end (I did) just clip it off.

Sew the tent to one end of the ground piece.

Glue the ground (with the tent) into the bottom of the tin, and glue the sky piece into the lid. I used E6000 glue for this and it hasn't budged!

To make the mat/blanket you can just cut out the gray felt piece and put it in the set as-is, or you can add a small loop of elastic so the mat can be rolled up. I just sewed a loop to one end like this:

Then you can roll the mat and wrap the loop around:

Perfect for tucking in your little bear!

Now for the bear/Ewok. Cut out all the bear body parts (medium brown) and the face, tummy and ears (light brown). Place the face and tummy on the front body and sew around the edges.

Make the eyes and nose with the black embroidery felt. I'll tell you now, this is probably not the way to do it but I don't know how to embroider and it worked. I cut a piece of floss a few inches long and tied a triple knot in the middle:

Then I used an embroidery needle to feed each end through on either side of where I wanted the nose:

And tied the ends together on the back:

I did the same thing to make the eyes.
Then I used regular brown thread to make a little smirky smile on his face.

Now you can put the whole bear together. Lay out the bear back and stack the arms and legs on top of it (each arm and leg is two pieces of felt stacked together to make them a little thicker). Also put the light brown ears over the back ears, even though I don't show it here.

Stack the bear front on top. Make sure he has a face. I make this mistake on my first bear and he did not turn out so good when I tried to add the face at the end.

Use a needle and thread to whipstitch around the edge of the front body. This will join all the limbs and the ears to the body.

Then stitch around the arms and legs.

To make the hood, stack the two pieces and sew the edges between the two ears, and between each ear and arm. You need to leave the ear openings open, and leave the the part that goes over his arms open. I put it on the bear while I did it to get a good fit, but you have to be very careful not to sew through the bear if you want the hood to be removable.

This was the bad face I tried to add after I made the bear. Yikes.
You're done!

All the pieces tuck inside for fun on the go. Just smoosh down the tent and everything else fits next to it.

Ta-da!

That's it! Now go get started, Christmas will be here before you know it! And don't forget to check out the rest of our Christmas projects here:
What gifts are you making this year? Have you started yet?
%20altoid%20tin%20playset%20with%20felt%20pieces!%20So%20cute%20and%20makes%20a%20great%20stocking%20stuffer!)
Dear Georgia, This product and pattern is © 2012 Kathleen Tinkham, all rights reserved. Not to be reproduced, duplicated, manipulated or transformed in any way. I would appreciate your taking down its content. This is a specialty item from my shop that has been offered on a limited basis from my shop since 2012. Made from 35 pieces and hundreds of tiny stitches you can see why I need to protect my work. Making it for yourself is flattering but offering a tutorial on your blog, showing your version which clearly copies mine while mentioning my shops name goes against my copyright. I would appreciate your taking down this item from your blog. Kathie Tinkham wishwithme.etsy.com.
ReplyDeleteKathleen,
DeleteI have nothing but respect for you and your work, and after looking this over again I am going to rework the project to be less similar. I will also take down the link to your Etsy site that is driving traffic to your store.
However, I hope you know that both your business and mine depend on the fact that Copyright law doesn’t protect ideas, concepts or even “expression”, we all build on the work of those who go before us. Even in its current state, my project is a combination of ideas from your shop as well as others (which I’ve made clear in the tutorial). Having never seen your work in person, I assure you I used my own number of pieces and method of applying stitches.
A law you may not be aware of, however, renders it illegal to sell “trademarked” works created by others as your own. That’s why it would be illegal to sell, say, toy Stormtroopers or Jawas without the permission of Lucasfilm/Disney. Just something to keep in mind as you try to raise the specter of intellectual property rights. Sites like Etsy take those violations seriously when they are reported.
Love your store, and I wish you all the best in the future.
Hi Georgia, love your blog, fantastic ideas. I made a Story Box out of a chrome cigarette tin, a little forest adventure bear, I hope my son enjoys it as much as I did! Thanks again xx I can't work out how to attach a photo..... Great comeback for K btw, good work.
ReplyDeleteHope he loves it! They are so fun to make, aren't they? Unfortunately there isn't anyway for you to attach photos here, but I'd love to see! You can tag me if you share photos on instagram or facebook, or email me at morelikehome (at) gmail (d0t) com Thank you! :)
Delete