

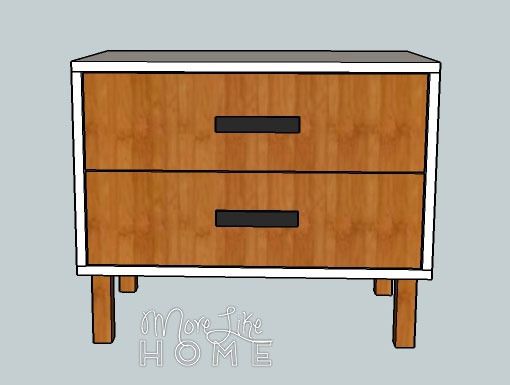
It's day ten and we're already over halfway through nightstand series! You can see the entire series here. Today we're looking at one of my favorite branches of the nightstand family tree with plans for a mini dresser in a modern style.

I love to use a small dresser as a nightstand. It holds so. much. stuff. so it's a great way to sneak a little extra storage into your space! Drawers look less cluttered than open storage so you can tuck everything nice and neat and out of sight. These are so functional they would also work great as side tables, or a small entry table if you lengthen the legs! There are several great ways you can customize this nightstand, such as substituting any set of legs you like (or even bun feet if your bed is particularly low). You could also opt to cut a notch out of each drawer front instead of using drawer pulls (like in Day 2).
These plans were inspired by another nightstand I spotted in Better Homes and Gardens. A bright coat of paint is another easy way to make your nightstand unique!
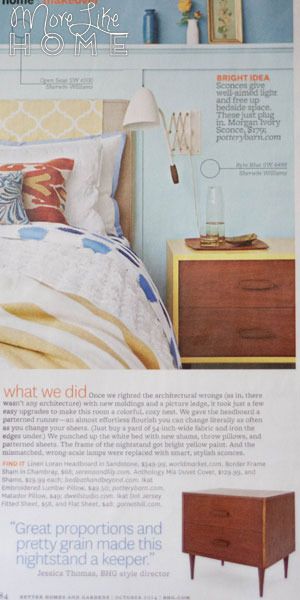
Image via Better Homes & Gardens
Or for an easy twist on these plans, you could omit the top drawer and put in a shelf instead.
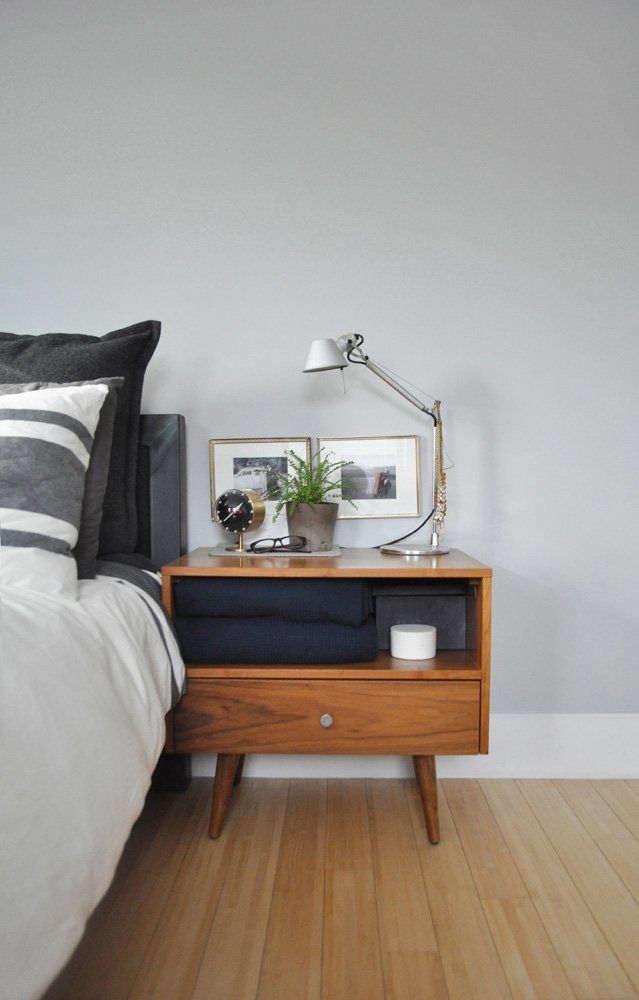
image via pinterest
Shopping List:
1 - sheet 3/4" plywood
1 - 1x6 @ 8'
1 - 1x8 @ 6'
1 - 2x2 @ 6' (or four 6" scraps) OR a set of legs about 6" tall (like this mid century modern style)
2 sets 16" side-mount drawer slides
2 drawer pulls.
wood filler
wood glue
1 1/4" screws
2" screws
Kreg Jig with 1 1/4" and 2 1/2" pocket screws (optional)
finishing nails (optional)
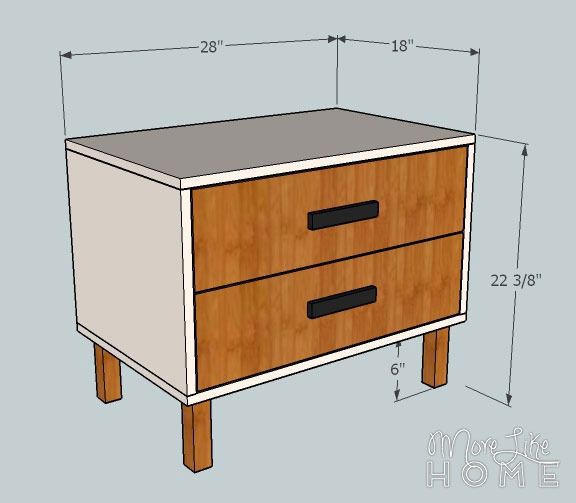
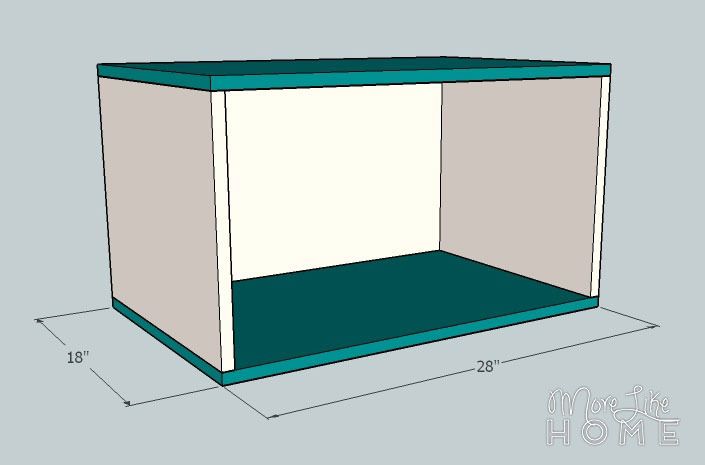
Finished Dimensions: 28" wide x 22 3/8" high x 18" deep
Remember to always double check your measurements before you cut. Use 1 1/4" screws unless otherwise indicated. Pre-drill your holes and countersink your screws. Always use glue before you screw the boards together (you don't have to let it dry first), I'm not going to list it in every step, but it's a good idea to glue everything! Be safe, and have fun!
Cut List:
(A) 1 - plywood @ 26 1/2 x 14 7/8" (back)
(B) 2 - plywood @ 18 x 14 7/8" (sides)
(C) 2 - plywood @ 28 x 18" (top/bottom)
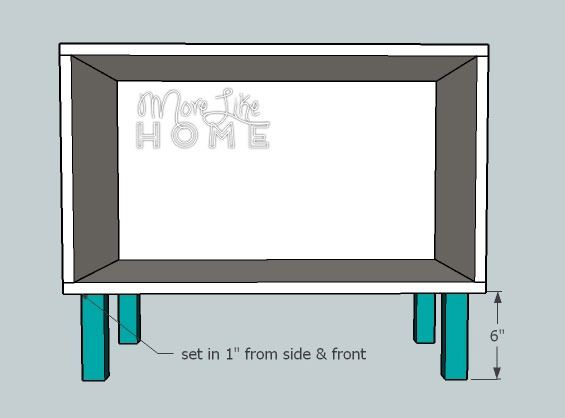
(D) 4 - 2x2 @ 6" (legs) OR a set of 6" legs
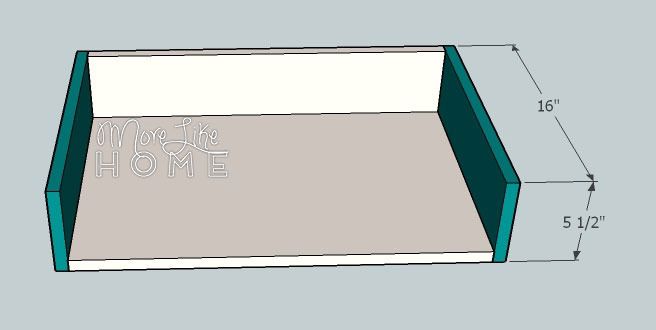
(E) 2 - plywood @ 24 x 15 1/4" (drawer bottom)
(F) 2 - 1x6 @ 24" (drawer back)
(G) 4 - 1x6 @ 16" (drawer sides)
(H) 2 - 1x8 @ 26 1/4" (drawer front)
Start by attaching one side (B) to each end of the back (A). Use a Kreg Jig or drill through the sides into the back (don't forget to glue all the steps!)

Attach the top and bottom (C), keeping the back and outside edges flush. Use a Kreg Jig or drill through the top & bottom into the sides and back.
Attach the legs (D). I've drawn them set in 1" from the sides, front, and back, but moving them around can really change the look of the dresser so try it out and see what you like! If you're using a different set of legs, follow the instructions to attach them. I'm using 2x2 legs in my plan because they are affordable and easy to find in-store. For 2x2 legs either use a Kreg Jig (I would try to get a pocket hole on multiple sides of the leg to make it more sturdy), or drill down through the bottom into the legs with 2" screws.
To build the drawer boxes, start by attaching a drawer back (F) to the back of the drawer bottom (E), keeping the edges flush. Use a Kreg Jig or drill through the drawer back into the drawer bottom. Double check the width of your nightstand opening first. Your drawer box will need to be 1" narrower for most drawer slides.

Attach the drawer sides keeping the back and bottom edges flush. Use Kreg or drill through the sides into the bottom and back.
Follow the instructions on your drawer slides to install the drawer boxes. The boxes should end up set back 3/4" from the face of the nightstand (so your drawer fronts will end up flush in the next step). Make sure one drawer box is completely above the center of the nightstand and one is completely below.

Center your drawer fronts with a 1/8" gap all around and in between the drawer fronts. Attach them using glue and finishing nails (you can reinforce them with a Kreg Jig). It may help to trace the drawer box on the face of the drawer front first so you know where to nail. Also, you'll want to attach one drawer front, then install its knob before attaching the second drawer front. You don't want to be stuck with two closed drawers with no knobs to get them open!

The building is done, now you just have to finish it! Start by filling any holes with wood filler. Let it dry, then sand it smooth (repeat if necessary). Then sand the whole table smooth for a great finished product (a good sanding can be the difference between looking professional vs. crafty). Then finish with any paint or stain and polyurethane you like. Reattach your knobs when everything is dry. Obviously I've been digging the two-tone wood-with-white-paint look lately, and this dresser is no exception! A coat of paint around the outer box of the nightstand will really make it stand out!

We hope you guys are having as much fun with these plans as we are! Stay tuned for the remaining 8 days of plans!

This comment has been removed by a blog administrator.
ReplyDeleteAbsolutely love this plan. Great look! I'm more of an intermediate DIY'er and am curious if anyone can advise on how to add the round "flared" legs from the pic? Curious about suggestions on how to go about this before going down the rabbit hole with limited knowledge. Thanks in advance!
ReplyDeleteHi! You would need to buy tapered legs (unless you want to turn your own which is way outside my skill set!). Something like these would be great (https://www.tablelegs.com/Mid-Century-Modern/McCobb-Feet.aspx) and you can get a different length if you want your nightstand a different height.
DeleteYou'll also need the hardware to attach the legs. If you want the legs to flair out like the picture, you'll need to buy the specialized hardware for that. They make a metal version (https://www.tablelegs.com/Parts/BunFootHardwareService/Angle-Top-Plate-Hardware-Service.aspx) that attaches each leg individually, and a wooden version (https://www.tablelegs.com/Mid-Century-Modern/Angled-Cleats.aspx) that attaches the legs in pairs.
Hope that helps! :)