
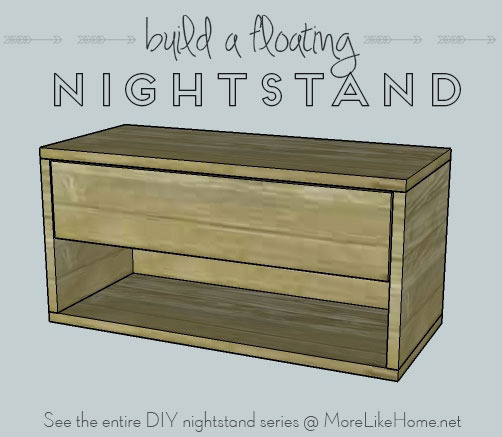
Hello and welcome to day nine of our nightstand series! You can see the entire series here. Today's project is our third "floating" installment (we already made floating boxes and a floating bookshelf). With both a shelf and a drawer, this plan offers plenty of storage options in a style that is simple, sleek, and unique!

Floating nightstands are a great way to make your space instantly feel less cluttered. The drawer lets you take it a step farther by stashing any would-be tabletop clutter out of sight! This plan is based on a simple, uncluttered inspiration photo I spotted on Pinterest and is a quick, easy build:
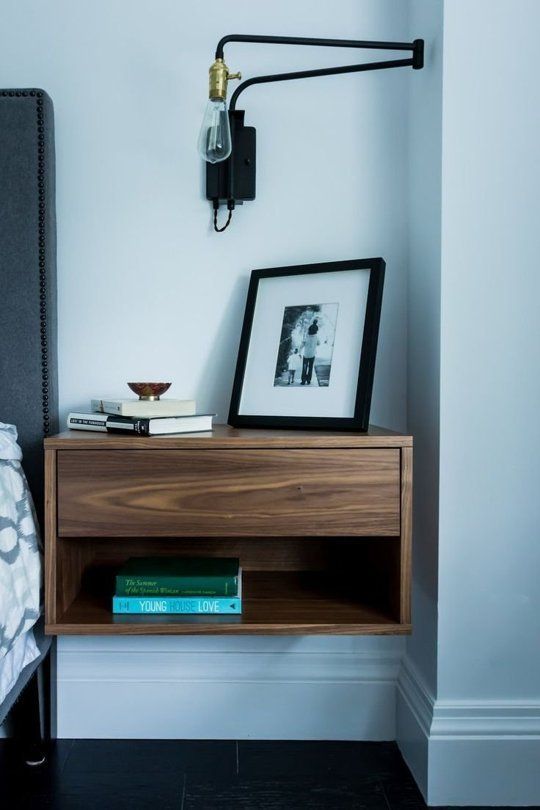
image via pinterest
Shopping List:
1 - 1x12 @ 10'
1 - 1x10 @ 4' (or a 2' scrap)
1 - 1x4 @ 4'
1 - 1x6 @ 4' (or a 2' scrap)
9" side-mount drawer slides (full extension is best if possible)
wood filler
wood glue
1 1/4" screws
2" screws
Kreg Jig with 1 1/4" pocket screws (optional)
finishing nails (optional)
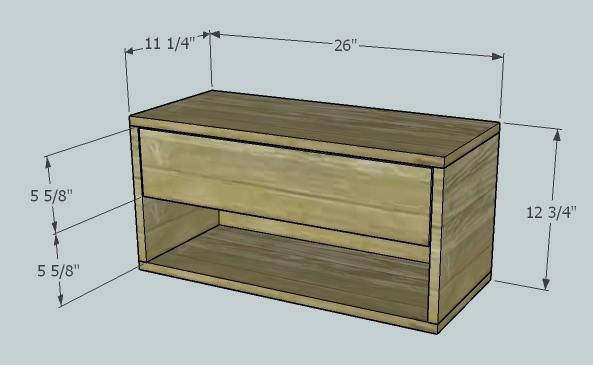
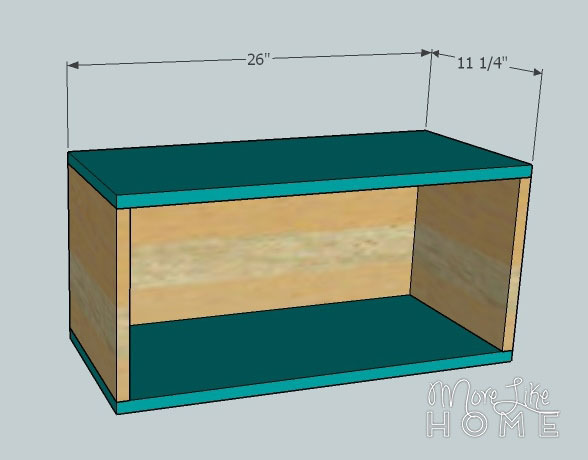
Finished dimensions: 26" wide x 12 3/4" tall x 11 1/4" deep
Remember to always double check your measurements before you cut. Use 1 1/4" screws unless otherwise indicated. Pre-drill your holes and countersink your screws. Always use glue before you screw the boards together (you don't have to let it dry first), I'm not going to list it in every step, but it's a good idea to glue everything! Be safe, and have fun!
Cut List:
(A) 1 - 1x12 @ 24 1/2" (back)
(B) 2 - 1x12 @ 11 1/4"" (sides)
(C) 2 - 1x12 @ 26" (top/bottom)
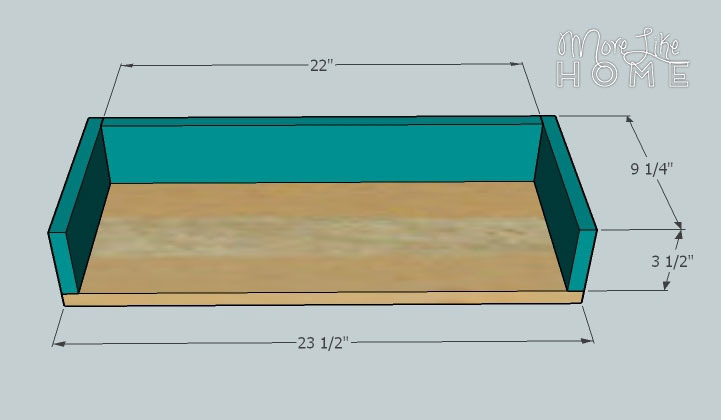
(D) 1 - 1x10 @ 23 1/2" (drawer bottom)
(E) 2 - 1x4 @ 9 1/4" (drawer sides)
(F) 1 - 1x4 @ 22" (drawer back)
(G) 1 - 1x6 @ 24 1/4" (drawer front)
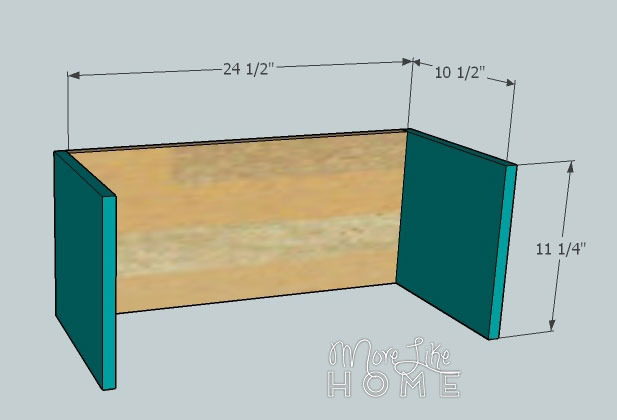
Start by attaching the sides (B) to the back (A). Keep the edges flush. Use a Kreg Jig (this will hide the holes on the back), or drill through the sides into the back.
Attach the top & bottom (C). Use a Kreg Jig or drill through the top and bottom into the sides and back.
Next build the drawer box. Start by attaching a drawer side (E) along each side of the drawer bottom (D). Keep the outside edges flush, and attach with a Kreg Jig or by drilling through the bottom into the sides. Then slip the drawer back (F) between the sides and attach it in the same way, keeping the outside edge flush. Double check the opening of the nightstand - the drawer box should end up 1" narrower unless your drawer slides require a different allowance.
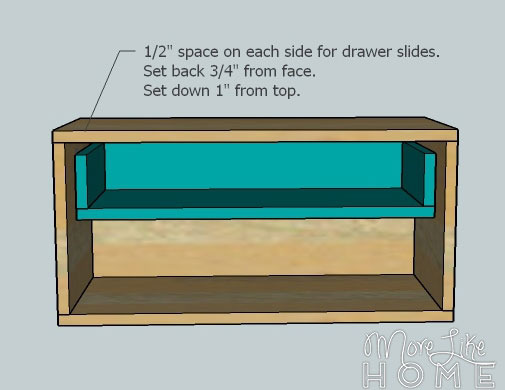
Follow the instructions on your drawer slides to install the drawer box. The drawer box should be set back 3/4" from the face of the nightstand (so you drawer front ends up flush later) and 1" down from the top.
Set the drawer front over the drawer box and center it with 1/8" gap above and on each side. Use glue and finishing nails to attach the drawer front to the drawer box (you can also reinforce it with a Kreg Jig).

The building is done, now you just have to finish it! Start by filling any holes with wood filler. Let it dry, then sand it smooth (repeat if necessary). Then sand the whole table smooth for a great finished product (a good sanding can be the difference between looking professional vs. crafty). Then finish with any paint or stain and polyurethane you like.
You can add a drawer pull if you like, or to keep the simple look just use the lip under the drawer front as a pull.

We're halfway done, there are still nine more days of DIY nightstands coming up!

This is a great looking nightstand! How do you attach it to the wall though?
ReplyDeleteScrew it directly to the wall - take the drawer out and drill through the back of the nightstand into the wall, being sure to hit studs. I'd say you need at least 3" screws, depending on the thickness of your drywall.
Deletethank you so much!
DeleteYou're welcome! Enjoy!
DeleteCut measurements are wrong. Cut sides to 11 1/4". Cut drawer front to 24 1/4". I used a kreg jig and had no need for 2 1/2" pocket screws.
ReplyDeleteSo sorry about that! Thank you for commenting, everything should be fixed now.
Deletehow much does this cost to make? (lumber and drawer slides)
ReplyDeleteYou'll probably have to order drawer slides to get the right length. These ones are $10 - http://www.amazon.com/gp/product/B008FZON3C/ref=as_li_tl?ie=UTF8&camp=1789&creative=390957&creativeASIN=B008FZON3C&linkCode=as2&tag=moliho-20&linkId=2N3DE25IZ3SV4OVP
DeleteAs far as lumber my (very rough) estimate would be around $40, but it's been a while since I've price checked. :)
I'd like to make this without the bottom shelf area. What measurement changes do I need to make? I'm rather inexperienced, I'd hate to mess it up figuring this on my own.
ReplyDeleteHi, You would need to make the sides 5.75" tall to fit just the drawer. You'll also need cut the back down to that height as well. Happy building!
DeleteHey love the finish on these. What type of wood/stain did you use on these?
ReplyDeleteHi! Unfortunately the picture is an inspiration photo I found on pinterest, so I'm not sure about the finish. The other images are just drawings from Sketchup. Sorry I can't help!
DeleteI made two of these for my guest bedroom. Thanks a bunch for the idea. I used led lighting underneath to give it a floating effect.
DeleteYou're welcome! My husband might borrow the led idea. :)
DeleteHello,
ReplyDeleteJust wondering what kind of weight these can support? Looking to do a concrete top surface.
Hi, I haven't weight tested it so I can't give you specific limits, but for a floating table the way you attach it to wall will be even more important than the limits of the wood. You don't want it ripping out of the wall! As long as you anchor it securely into studs, I think it would able to support a concrete top that's not too thick. :)
DeleteHello - did you happen to use these plans for your concrete countertop? We are looking to do the same... wondering how you did it. Thanks.
DeleteHi! We did make concrete countertops but not with these plans. You can get all the details here: http://www.morelikehome.net/2012/09/diy-concrete-countertops-tutorial.html
DeleteLooks like a great tutorial and relatively easy to build. My only problem is I want to make it a little shorter and need dimensions in cm... Can you help? I want the top/bottom to measure 55 cm across (roughly 21.8 in)...what should all the other cuts be, specifically the drawer?
ReplyDeleteLooks like a great tutorial and relatively easy to build. My only problem is I want to make it a little shorter and need dimensions in cm... Can you help? I want the top/bottom to measure 55 cm across (roughly 21.8 in)...what should all the other cuts be, specifically the drawer?
ReplyDeletenevermind, I've decided to just add a shelf instead of a drawer:)
DeleteGlad you figured it out. :) Have fun!
DeleteWhere did you find 9-inch side mount drawer slides? I have looked at the big box stores and on-line and can not find anything shorter than 10-inch.
ReplyDeleteI've had luck finding odd sizes on Amazon. http://amzn.to/2jiSXWh
DeleteThe catch is that they sometimes don't include instructions or screws. :/ I haven't tried these specific slides, as I haven't built this myself. Hope that helps, though.
The measurements are off.. if the sides are 11 1/4x 12.. and the back is 24 1/2 by 12 and you screw the sides into the back keeping the 12in flush... you have 11 1/4 depth which has the top and bottom too long at 12.. so wouldn’t they need to be 11 1/4 x 26?
ReplyDeleteHi! 1x12s are actually only 11 1/4" wide, so when you cut a piece 11 1/4" long, you actually end up with a square that's 11 1/4 x 11 1/4. Because lumber sizing is ridiculous. :) The same goes for the top - even though it's a 1x12, it comes 11 1/4" wide so it should fit perfectly. :)
DeleteWhat is a good resource for finding wood slabs? We'd like to do solid walnut.
ReplyDeleteHi, Your best bet would probably be to look for something local to avoid a large shipping cost. I would google "wood slabs" with the name of your town (or your nearest metropolitan area if you are rural) and see what comes up! :)
DeleteWith the top and bottom being 11 1/4” wide and the sides only 10 1/2”, wouldn’t this cause the top and bottom to have some hanging over the front?
ReplyDeleteSorry, I should have made that drawing more clear. The 10 1/2" is from the front edge to the inside of the back board. The back board adds another 3/4", so the total depth is 11 1/4" just like the top board. Hope that helps! :)
DeleteI want to make this 20 inches deep instead of 11 1/4. Will This depth still be sturdy or will it need legs?
ReplyDeleteI honestly don't know, I've never tried this with something of that depth myself! My gut is that it would probably be ok if you anchor it into the studs and don't put anything too heavy on it. But I can't make any promises. You could always go for it and add legs at the end if you feel it isn't sturdy enough! :)
Delete