

Welcome to day four of our nightstand series! You can see the entire series here. Today's plan has a simple, modern silhouette. The notched drawer gives it a unique look and doubles as a handle for opening drawer - plus you can run a cord out through it for easy tabletop charging!

Today's plans were inspired by this metal nightstand from the 2015 Ikea catalog. I won't say you'll beat Ikea's price (it's only $30) but if you prefer wood or don't have an Ikea nearby, these plans are for you! Or you can add the notched feature to any nightstand you plan to build.
Shopping List:
1 - 2x2 @ 8'
1 - 1x6 @ 4' (or two 11" scraps)
1 - 1x4 @ 8'
1 - 1x2 @ 4'
1 - 1x12 @ 10" (you'll probably have to buy a full 4' board unless you have a scrap)
12" drawer slides
wood filler
wood glue
1 1/4" screws
2" screws
Kreg Jig with 1 1/4" and 2 1/2" pocket screws (optional)
finishing nails
Finished Dimensions are 22 1/2" tall x 18 3/4" wide, by 14" deep.

Remember to always double check your measurements before you cut. Use 1 1/4" screws unless otherwise indicated. Pre-drill your holes and countersink your screws. Always use glue before you screw the boards together (you don't have to let it dry first), I'm not going to list it in every step, but it's a good idea to glue everything! Be safe, and have fun!
Cut List:
(A) 4 - 2x2 @ 22" (legs)
(B) 1 - 1x6 @ 13" (back)
(C) 2 - 1x6 @ 11" (sides)
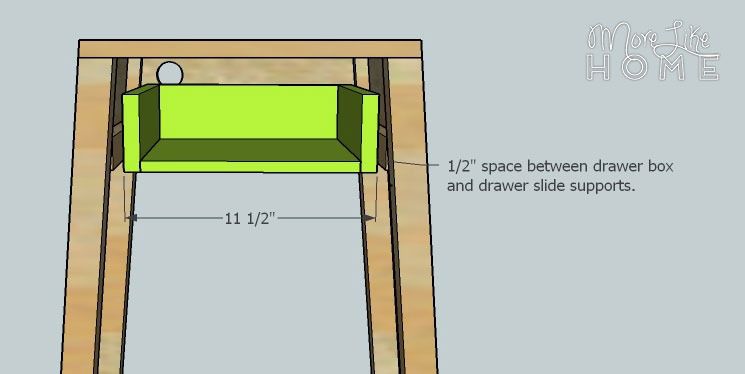
(D) 2 - 1x2 @ 11" (drawer supports)
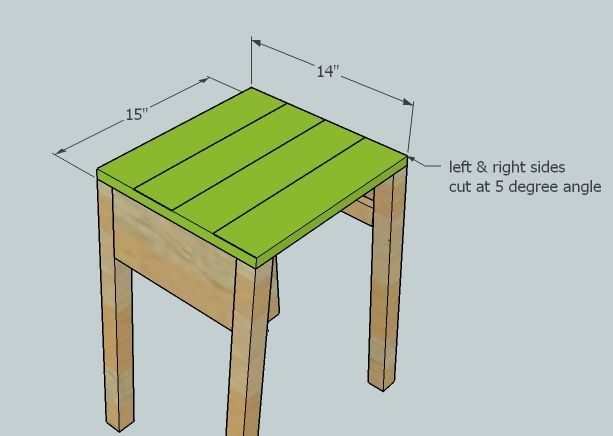
(E) 4 - 1x4 @ 15" (top)
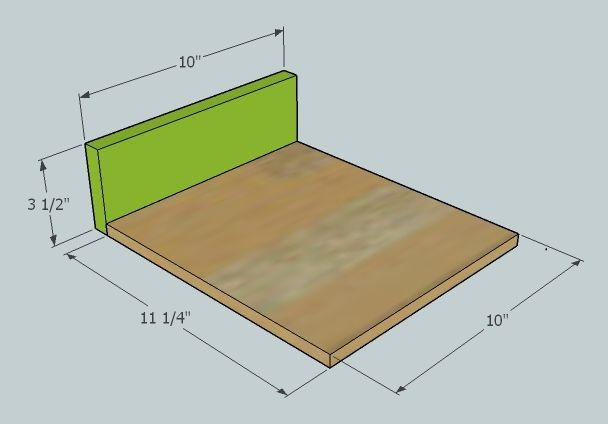
(F) 1 - 1x12 @ 10" (drawer bottom)
(G) 1 - 1x4 @ 10" (drawer back)
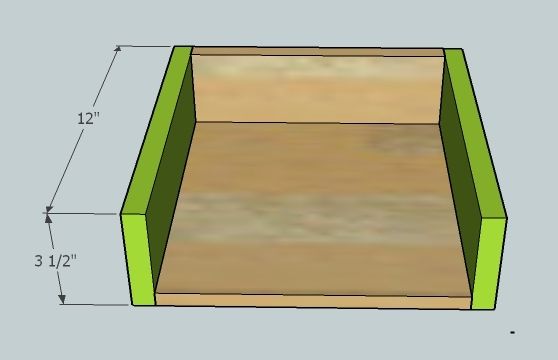
(H) 2 - 1x4 @ 12" (drawer sides)
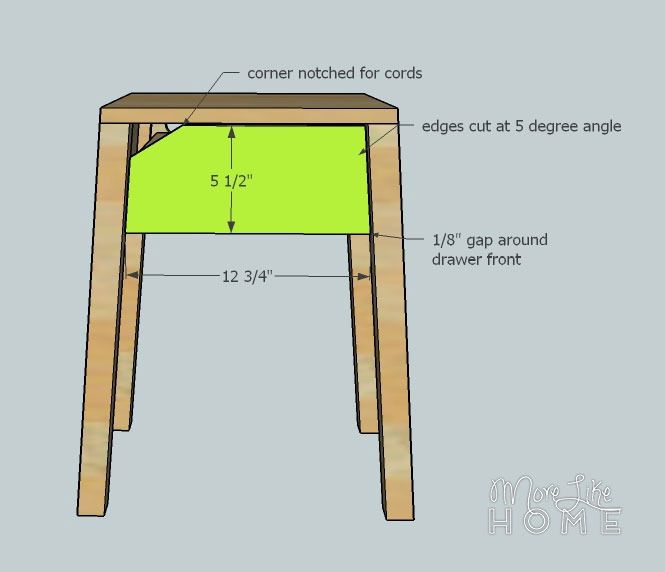
(I) 1 - 1x4 @ 12 3/4" (drawer front)
Start by cutting the ends of each leg (A) at a 5 degree angle. Make sure the cuts on each leg are parallel (like this /=/, not this /=\).

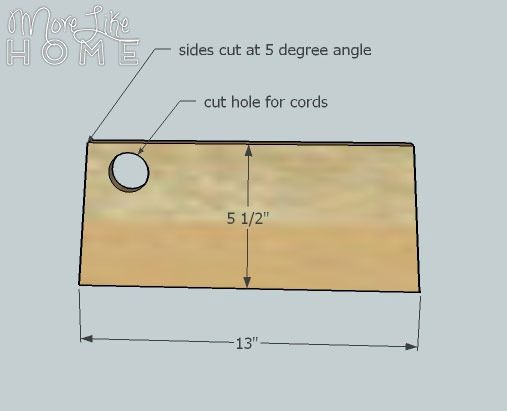
Prepare the back board (B) by cutting each side at a 5 degree angle as shown below. The bottom edge should stay 13" wide and the top will now be slightly narrower. If you want to run a charging cord or power strip into the drawer (you can pull it out through the notch in the drawer front for charging) make a hole near the top of the back board. You can use a large drill bit (make sure whatever cord you use will fit through, probably 1 - 1.5") or use a reciprocating saw to cut a notch out.
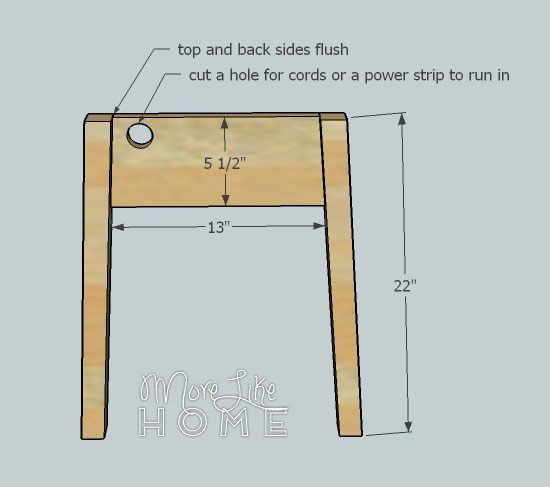
Now attach a leg to each side of the back board. The top and back edges should be flush, and make sure the tapers on the legs are pointing the right direction (out toward the sides, not front or back). Use a Kreg Jig or drill through the legs into the back board.
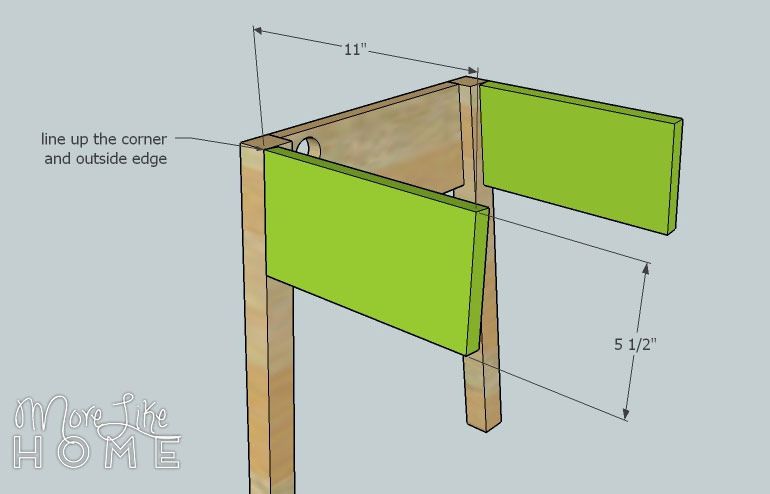
Attach the sides (C). You don't need to taper the top edge since it will be hidden in the end. Just line up the outside edges and top corner flush. Attach the sides using good old Kreg, or by drilling through the legs into the side boards (careful not to hit the screw holding the back).
Attach a front leg (A) to each side. Line up the top corners and outside edges flush (again make sure the leg tapers point out to the sides). Attach with a Kreg Jig or by drilling through the legs into the sides.

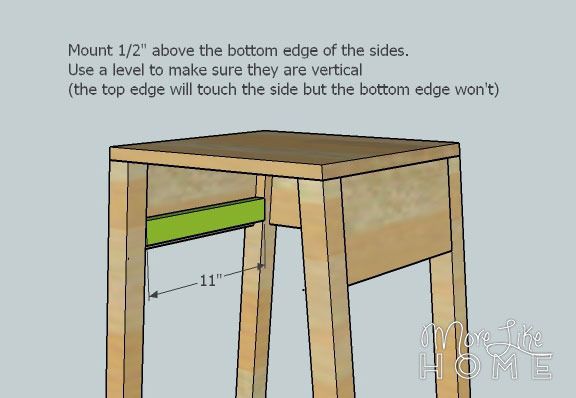
Install the drawer supports (D). They should be 1/2" above the bottom edge of the side boards. It's important to install these vertically (not at an angle like the sides) so your drawer slides will work properly, so use a level. Set the top right against the side of the table, then swing the bottom out a little until it is perfectly level. Attach using a Kreg Jig or by drilling through the supports into the side boards (but be careful not to let the board go out of level. It may help to add a shim to keep it in place. Double check the width between the support before building your drawer box! The finished drawer should be 1" smaller than the space.
Attach the top (E). Ignore the top in the previous photo. :) Cut the end of each top board at a 5 degree angle (like this /=\). Double check the measurements first, you want a good fit here. You can use a Kreg Jig to attach the boards together side by side first, or just attach each one to the table individually. Make sure the table is square as you go. Attach the boards using glue and finishing nails.
Then assemble the drawer box. Start by attaching the drawer back (G) to the drawer bottom (F). Use a Kreg Jig or drill through the back into the bottom.
Attach the drawer sides (H) using Kreg, or by drilling through the sides into the back and bottom.
Follow the directions on your drawer slides to install the drawer box. Make sure it sits back 3/4" from the face of the nightstand so your drawer front will end up flush in the next step.
Prepare the drawer front by cutting each side at a 5 degree angle. Make a notch out of the top corner by measuring in 2" from the side, then 1.5" down from the top. Connect the marks and cut along the line.

Set the drawer front in place and center it with a 1/8" gap above and on each side. Use finishing nails and glue to attach it to the drawer box (you can reinforce it with a Kreg Jig).
The building is done, now you just have to finish it! Start by filling any holes with wood filler. Let it dry, then sand it smooth (repeat if necessary). Then sand the whole table smooth for a great finished product (a good sanding can be the difference between looking professional vs. crafty). Then finish with any paint or stain and polyurethane you like. Try a crisp white or a minty green!

You can run a small power strip through the back of the nightstand into the drawer. Then just open the drawer to plug in your charger. Your phone can sit on top with the cord running through the notch. When your done charging just tuck the cord back in and say goodbye to the clutter!

Need more nightstand ideas? We have 14 more days of DIY nightstands coming up!

No comments:
Post a Comment