

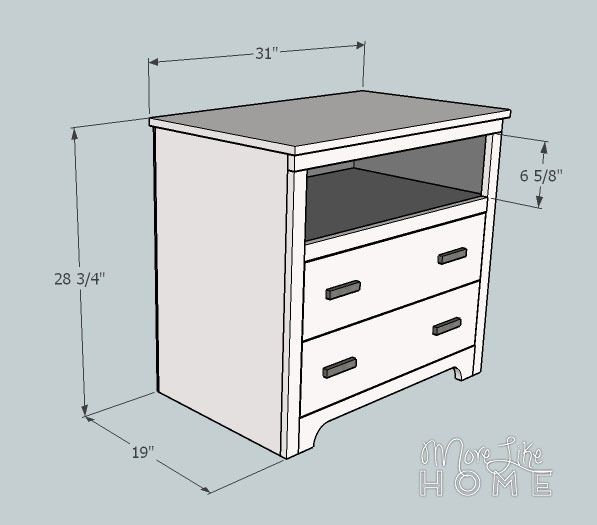
Hello again! Today we're working on the fifteenth plan in our DIY nightstand series. If you're just joining us you can check out the entire series here. Today's plan is another mini dresser (we also did one on day 10), this time in a more classic style inspired by our own little yard sale dresser. This is one of our larger nightstand design and features two roomy drawer plus an open shelf. It's great as a nightstand, side table, entry table, in the nursery, or anywhere you need a small dresser!

Shopping List:
1 - sheet 3/4" plywood
2 - 1x2 @ 10'
1 - 1x4 @ 6'
3 - 1x6 @ 8'
1 - 1x8 @ 8'
2 sets 16-17" side mount drawer slides
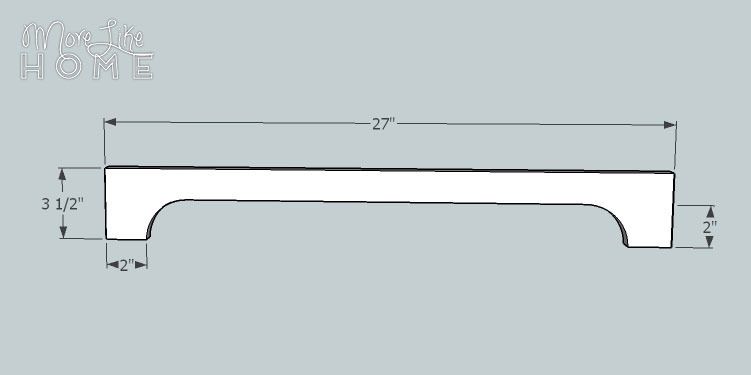
4 drawer pulls
wood filler
wood glue
1 1/4" screws
2" screws (if you don't have a Kreg Jig)
Kreg Jig with 1 1/4" pocket screws (optional)
finishing nails (optional)
Remember to always double check your measurements before you cut. Use 1 1/4" screws unless otherwise indicated. Pre-drill your holes and countersink your screws. Check for square often. Always use glue before you screw the boards together (you don't have to let it dry first), I'm not going to list it in every step, but it's a good idea to glue everything! Be safe, and have fun!
Cut List:
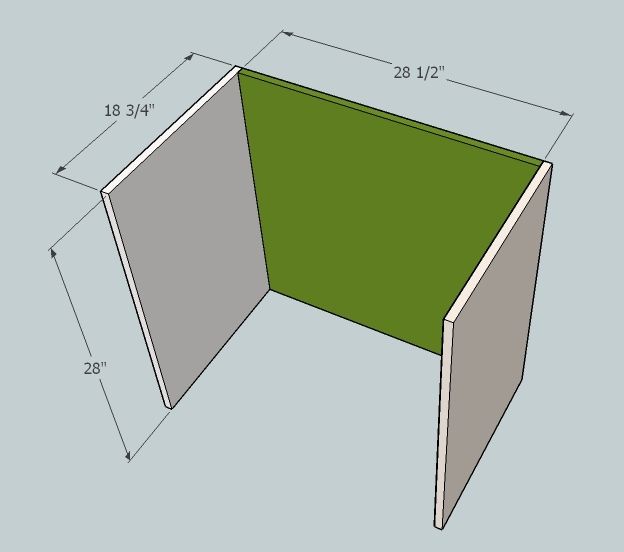
(A) 1 - plywood @ 28 1/2 x 28" (back)
(B) 2 - plywood @ 18 3/4 x 28" (sides)
(C) 1 - 1x2 @ 30" (top trim)
(D) 2 - 1x2 @ 26 1/2" (side trim)
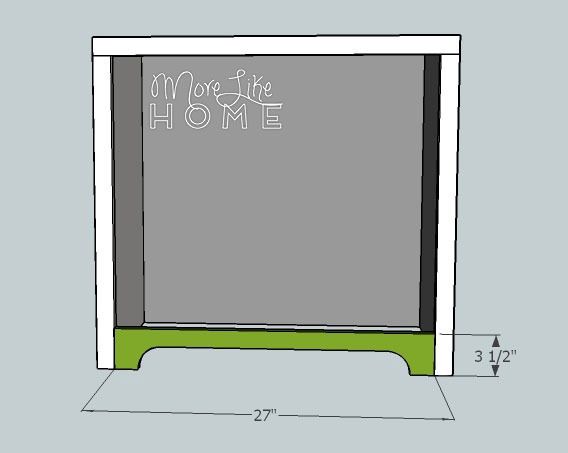
(E) 1 - 1x4 @ 27" (toe kick)
(F) 6 - 1x2 @ 18" (shelf and drawer supports)
(G) 1 - plywood @ 28 1/2 x 18" (shelf)
(H) 1 - 1x2 @ 27" (shelf trim)
(I) 2 - plywood @ 24 1/2 x 15 1/2" (drawer bottom)
(J) 4 - 1x6 @ 24 1/2" (drawer back)
(K) 4 - 1x6 @ 17" (drawer sides)
(L) 2 - 1x8 @ 26 3/4" (drawer front)
(M) 3 - 1x6 @ 31" (top)
(N) 1 - 1x4 @ 31" (top)
Start by attaching the sides (B) to the back (A). Keep the back, top, and bottom edges flush. Use a Kreg Jig, or drill through the sides into the back.

Add the side trim (D). It should sit right under the top trim and the outside edges should be flush with the sides, leaving a 3/4" overhang toward the middle (and the bottom edges should be flush with the bottom of the sides).

If you want to get fancy with the toe kick (E), use a reciprocating saw or jigsaw to cut a curved notch out of the bottom. Make the notch 2" in from each side and 2" up from the bottom. Use a cup or bowl to trace the curves to be sure they match. You could alternatively leave the 1x4 straight, or even use a piece of decorative molding in its place.
Attach the toe kick (E) at the bottom between the side trim boards (keep the bottom edges flush) using a Kreg Jig or by drilling through the side trim into the ends of the toe kick with 2" screws.
Next install a shelf support (F) on each side of the dresser set down 8 7/8" from the top edge of the dresser. Be sure to keep it level. Drill through the support into the side board to attach it.
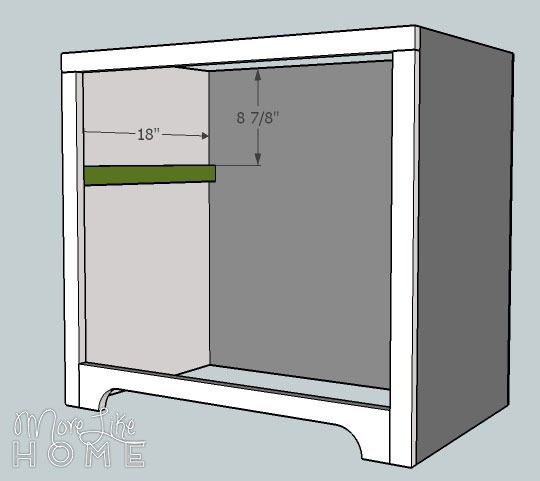
Set the shelf (G) across the shelf supports. You can screw it to the supports, or just set it in place. The front trim will keep it from going anywhere. If you have a Kreg Jig, you can skip the supports and use that to attach the shelf directly to the sides and back of the nightstand.
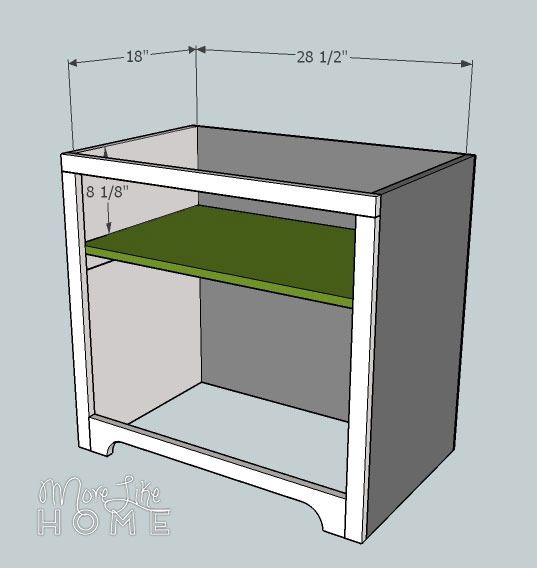
Attach the shelf trim (H) to the front of the shelf. Keep the top edge flush with the top of the shelf. Attach it with a Kreg Jig or by drilling through the trim into the shelf (you could also use finishing nails, don't forget the glue).
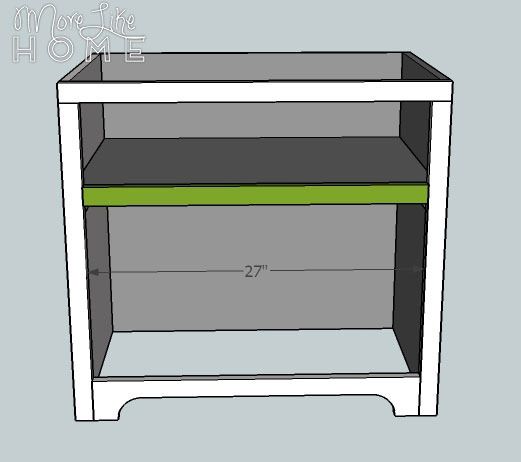
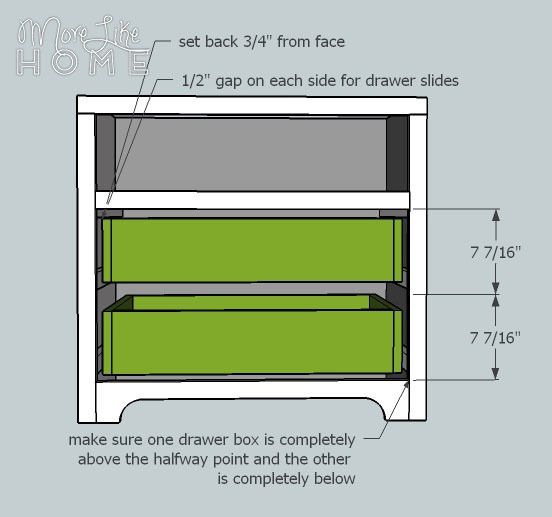
Attach the drawer supports (F) on each side of the nightstand. Make sure one set is completely above the halfway point of the drawer opening, and the other is completely below. Also be sure to keep each set of slides level. Attach them by drilling through the supports into the sides of the nightstand.

Attach a drawer back (J) to both the front and back of each drawer bottom (I). Keep the bottom and outside edges flush. Use a Kreg Jig or drill through the drawer backs into the drawer bottom. Double check the width of your drawer opening first. Most drawer slides require the drawer box to be 1" narrower than the opening.
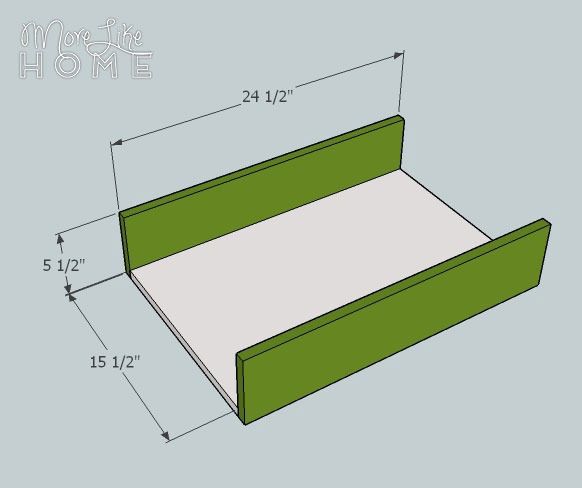
Add the drawer sides (K) to each drawer box. Use Kreg or drill through the sides into the drawer bottom and backs.
Follow the instructions on your drawer slides to install the drawer boxes, again making sure you keep one completely above the halfway point and one completely below. Also make sure they are set back 3/4" from the face of the nightstand so your drawer fronts end up flush later.
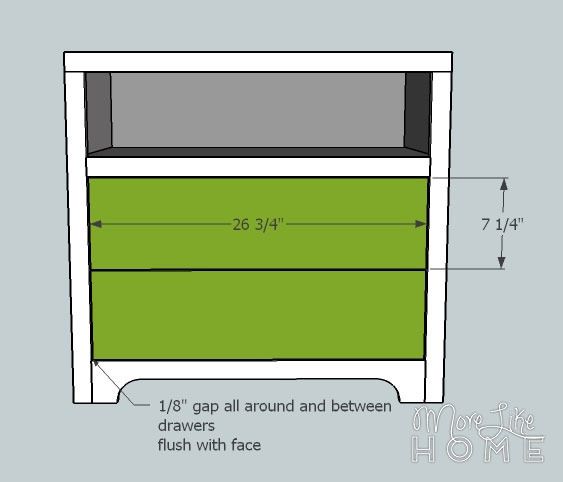
Center the drawer fronts (L) over each drawer box and center them with 1/8" gap all around and in between the drawer fronts. Attach with glue and finishing nails. Once you remove the drawer boxes you can reinforce it with a few screws from the inside if you like.
Lay the top boards (M & N) side by side on top of the nightstand with the 1x4 in back. Double check that the nightstand is square first by measuring corner to corner across the top. The measurements should be equal. The boards should have a 1/2" overhang in the front an on each side, and be flush with the back edge. If you have a Kreg Jig you can attach these boards to each other first. If not, just attach each one individually by drilling down through the top boards into the sides, front, and back.

The building is done, now you just have to finish it! Start by filling any holes with wood filler. Let it dry, then sand it smooth (repeat if necessary). Then sand the whole table smooth for a great finished product (a good sanding can be the difference between looking professional vs. crafty). Then finish with any paint or stain and polyurethane you like. Don't forget to add the drawer pulls too.

You know I love a crisp coat of white paint, but you could also mix it up with an olive green.
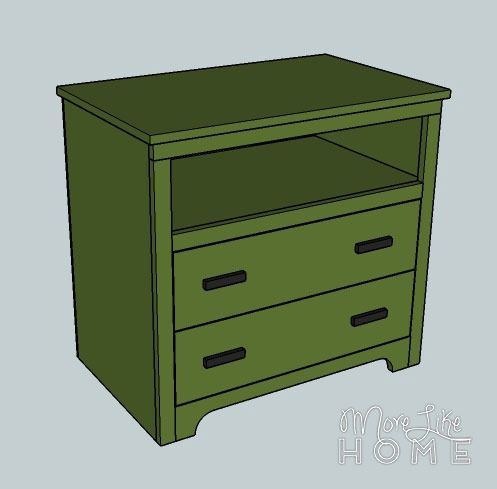
Add a basket or two to the shelf for more organizing options!

We only have three days left in the series, but they're going to be good!

You say:
ReplyDelete1 - 1x2 @ 10'
(C) 1 - 1x2 @ 30" (top trim)
(D) 2 - 1x2 @ 26 1/2" (side trim)
(F) 6 - 1x2 @ 18" (shelf and drawer supports)
(H) 1 - 1x2 @ 27" (shelf trim)
Wouldn't you need ~19'?
Same thing with the
Delete2 - 1x6 @ 8'
(J) 4 - 1x6 @ 24 1/2" (drawer back)
(K) 4 - 1x6 @ 17" (drawer sides)
(M) 3 - 1x6 @ 31" (top)
Don't you need ~22'?
Right on both, I'll change the shopping list. Thanks! :)
DeleteIs there a way to print these instructions from the webpage? Just wondering...Love the plan!
ReplyDeleteThanks
There isn't, I'm sorry! I've had a few people ask about that lately, so it's something I'm looking into for future plans. :)
DeleteThere is a way to print the webpage. Highlight what you would like to print then press CTRL and P at the same time on your keyboard. When your printer option opens select the printer labelled Microsoft Print to PDF or whatever the default printer option that is similar. You will have to save the file once you click print and then go to where ever you saved it and print it from there.
ReplyDeleteOh, this is great! Thank you! :)
DeleteWith the necessary wood cutting, is it possible to get everything cut as we need at lowes, home depot etc?
ReplyDeleteFor such a large number of cuts I would guess probably not. They will usually do a few cuts for free (like cutting down plywood into more manageable sizes). Some stores will do additional cuts for a fee, but others will just say "no." You'd probably have to go in to your store and find out (and it might even depend on who is working that day and how busy they are).
Delete