
Bonus points = this table can be built with basic tools (you'll just have to modify the apron a bit if you don't have a jigsaw). No need for a Kreg Jig like a few other plans in the series!
Measure twice, cut once (seriously, though). Use glue in every step (be careful to clean up any drips, because they can mess up your finish at the end!). Read through all the instructions before you begin. Use 1 1/4"" screws unless otherwise indicated. Pre-drill and countersink all your screws. Be safe, have fun, and let me know if you have any questions! Please note I have not built from these plans myself (you might be the first!), so double check everything as you go.
Shopping List:
1 - 1x6 @ 4' long
2 - 2x2 @ 8' long
1 - 1x10 @ 4' long
1 - 1x8 @ 8' long
1 1/4" wood screws
2" wood screws
wood glue
stainable wood filler
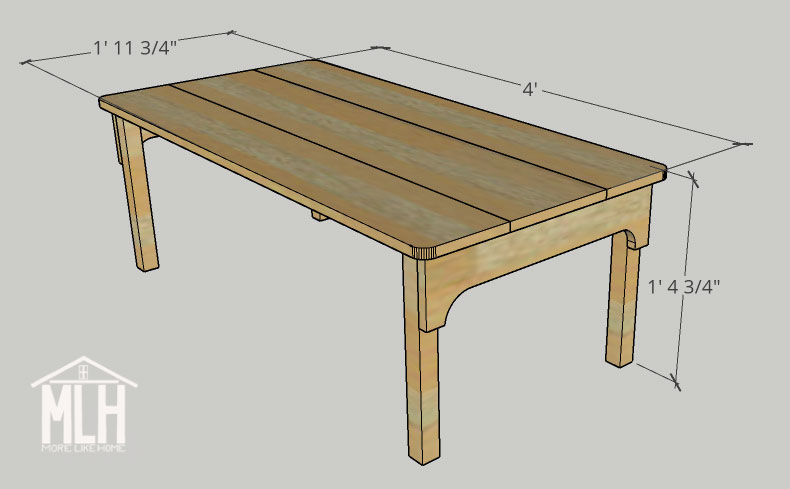
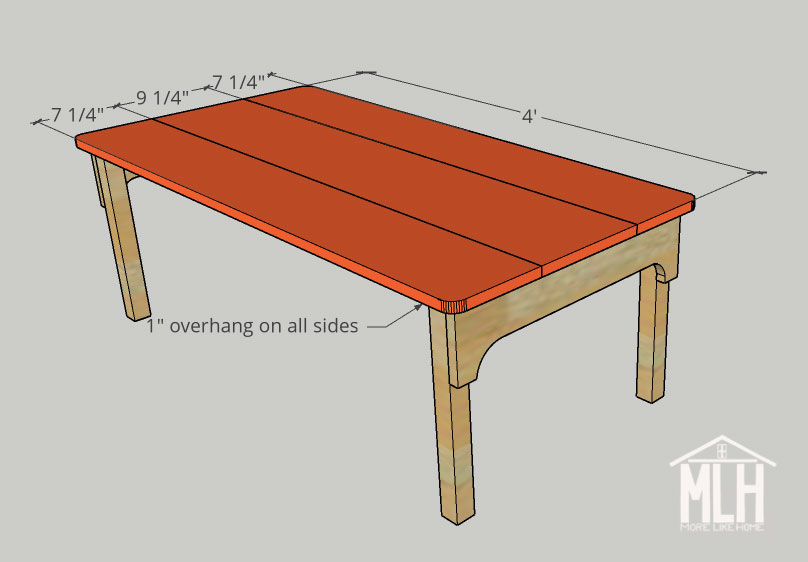
Finished dimensions are 48" long x 33 3/4" wide x 16 3/4" high.
You can easily modify the height by adjusting the length of the legs.
You can adjust the length by increasing or decreasing the length of the side boards and all the top boards by the same amount (i.e. subtract 3" from all of those boards to create a shorter table).
You can adjust the width of the table by adding more tabletop boards, or using different width boards for the top. Be sure to adjust the width of the support boards and aprons accordingly!
Cut List:
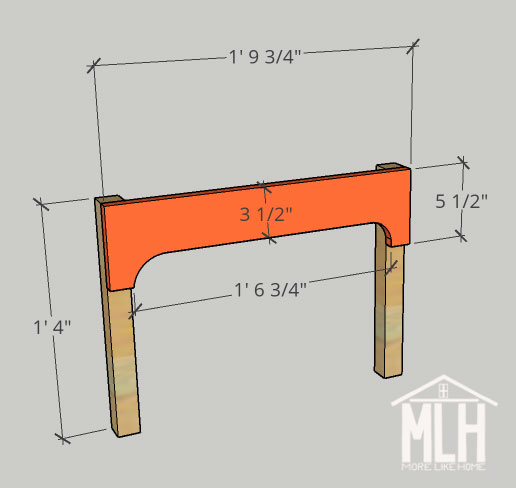
(A) 2 - 1x6 @ 21 3/4" (aprons)
(B) 4 - 2x2 @ 16" (legs)
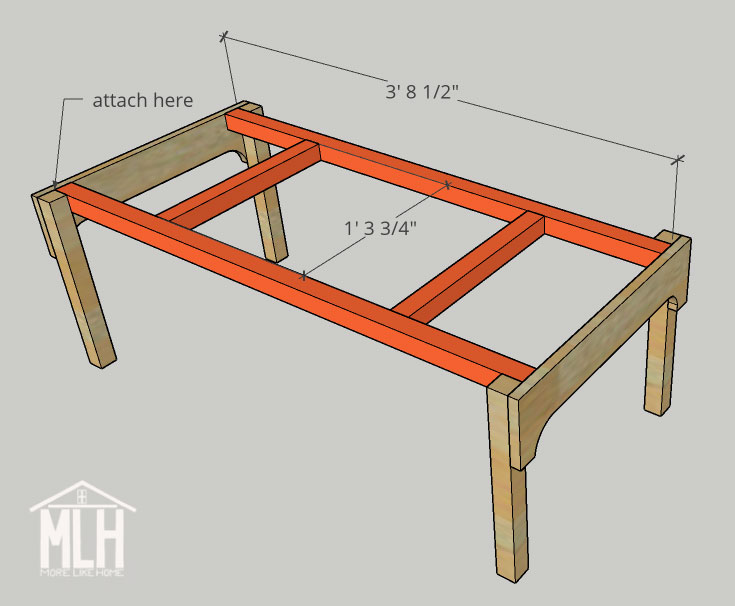
(C) 2 - 2x2 @ 44 1/2" (sides) **cut one of these from each 2x2 first!
(D) 2 - 2x2 @ 15 3/4" (supports)
(E) 1 - 1x10 @ 48" (top center)
(F) 1 - 1x8 @ 48" (top sides)
Start by cutting the accent notch in your aprons (A) with a jigsaw. These aprons are the defining feature of the table and give it so much character, so don't skip it if possible! Mark a notch that starts 1.5" in from each end and is 2" deep. Use a cup as a template to trace rounded corners before you start cutting.
If you don't have a jigsaw, you can just use the board as-is (or consider swapping it out for a narrower 1x4 board).
Line the apron up with the top and outside edges of the legs (B) and attach it by drilling through the apron into the legs with 1 1/4" screws. You could hide the holes by flipping it over and drilling through the legs into the apron with 2" screws, but for this table the visible holes will be a great addition to its character! We'll fill them with wood filler later so it will look tidy and give an appearance similar to wooden pegs - just like a real vintage table
Build the support structure by attaching the support boards (D) between the side boards (C). You can attach them by drilling through the sides into the ends of the supports with 2" screws, or use a Kreg Jig if you have one. The supports are set in 10" from either end.

Install the support structure between the two end sections you built earlier. It should fit between the legs and rest against the aprons. You can attach it by drilling through the aprons and legs into the ends of the the side boards, or use a Kreg Jig to make pocket holes in the ends of the side boards.
Line up the top boards (E & F) on top of the table and center them with a 1" overhang on all four sides. Attach them by drilling down through the top boards into the side and support boards with 1 1/4" screws. Again, screw holes will add to the vintage charm, but if you want to hide the screw holes you can flip the table over and drill up through the support boards into the top boards with 2" screws instead, but you must be careful not to drill all the way through.
If you have a jigsaw, use it to slightly round the corners of the tabletop. For vintage charm reasons. Also toddler head reasons.
To finish, fill any visible holes with wood filler then sand everything down really well. This is the most important step for a professional finish! Start with a rough sand paper, then go over everything with a medium paper, then again with a fine paper. Once it's super smooth, finish it with whatever paint or stain and sealer you like.

I love to see your finished projects! Tag me on instagram @more.like.home or share them on our facebook page!
Want more plans? Check out the rest of the coffee table series here and all our other building plans here!
No comments:
Post a Comment