

Want to give one a try? I'm putting these all in one post because, seriously, they are so easy they don't need their own space. So just scroll through to the one that catches your eye to get it's individual plans and shopping list. Finishing tips are all the way at the end. Happy building, peeps!
Note: all four tables use a standard 36" round table top because you can buy one pre-made at many home-improvement stores. Want a different size table? You can buy any size top and adjust the size of the table bases by changing the length of the stretchers. You also have the option to cut your own top from plywood.
Measure twice, cut once (seriously, though). Use glue in every step (be careful to clean up any drips, because they can mess up your finish at the end!). Read through all the instructions before you begin. Use 1 1/4"" screws unless otherwise indicated. Pre-drill and countersink all your screws. Be safe, have fun, and let me know if you have any questions! Please note I have not built from these plans myself (you might be the first!), so double check everything as you go.
1. The Square Base Table
Shopping List:
36" round table top (or a 4' x 4' plywood project panel 3/4" thick to cut your own top)
1 - 2x4 @ 8' long
1 - 2x4 @ 6' long
Kreg Jig + 2 1/2" pocket hole screws
2" wood screws
wood glue
sandpaper and finishing supplies
optional:3/4" plywood edge banding only if you cut a plywood top
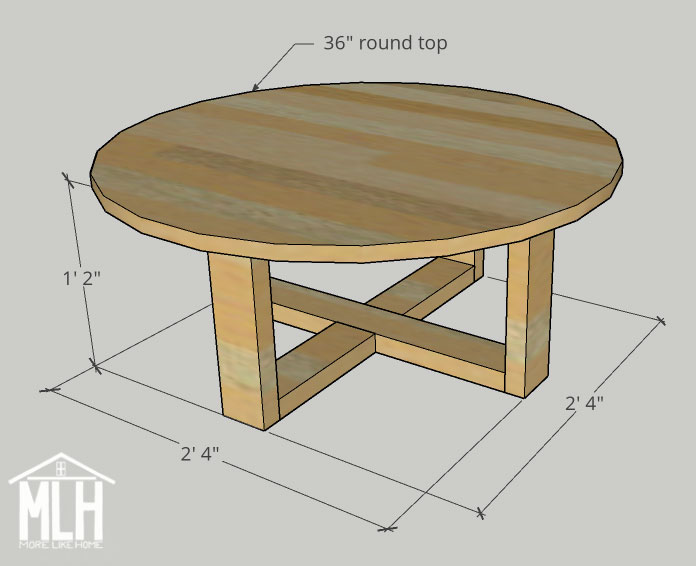
Dimensions: 36" top x 14 3/4" tall
Cut List:
(A) 4 - 2x4 @ 14" (legs)
(B) 2 - 2x4 @ 25" (stretchers)
(C) 4 - 2x4 @ 10 3/4" (side stretchers)
(D) 36" round top - either purchased or cut from plywood
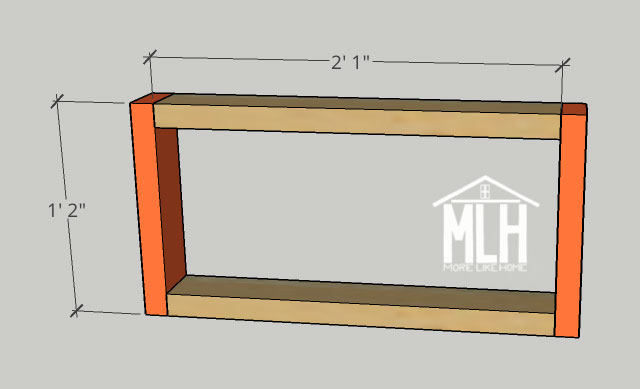
Start by attaching two legs (A) to the stretchers (B). Line one up flush with the tops of the legs and the other with the bottom. Use the Kreg Jig to make pocket holes along both ends of the stretchers and use the holes to attach the legs with 2 1/2" pocket hole screws. If you don't have a Kreg Jig, drill through the outside face of the legs into the ends of the stretchers with 2 1/2" wood screws. Don't forget the glue!
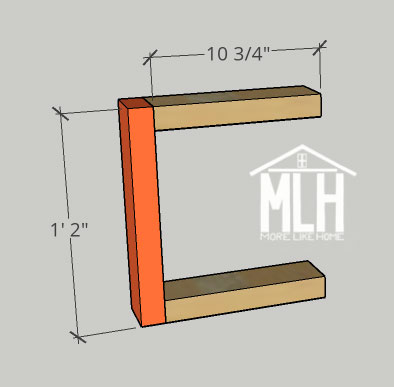
Build two side sections by attaching a side stretcher (C) to the top and bottom of each remaining board. Line one up flush with the tops of the legs and the other with the bottom. Use the Kreg Jig to make pocket holes along both ends of the stretchers and use the holes to attach the legs with 2 1/2" pocket hole screws. If you don't have a Kreg Jig, drill through the outside face of the leg into the ends of the stretchers with 2 1/2" wood screws. Don't forget the glue!
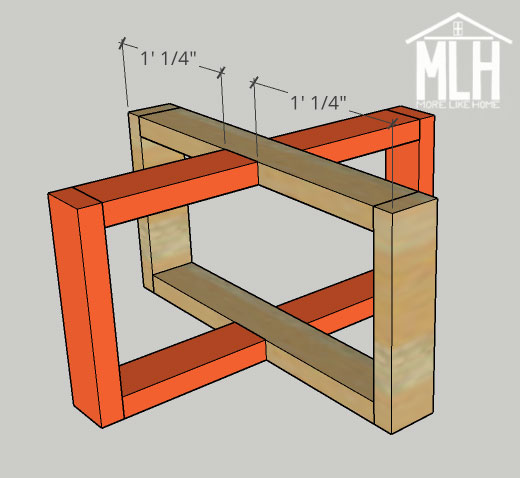
Attach the side sections to the main base section. Use the pocket holes in the free ends of the side stretchers to attach them to the main base with pocket hole screws. The side sections should be centered on the base with 1 1/4" space on either side. If you don't have a Kreg Jig, you can still build this base by drill through the sides of the side stretchers at an angle so you hit the main stretchers. You probably won't be able to completely hide the screw heads with this method, but you will be able to build the table without any specialty tools.
Now about that top. If you bought a 3' round top, you're ready to go! If you're cutting your own, start by using a small nail or tack to fasten a piece of string to the center of your plywood. Hold a pencil 18" from the nail and use the string as a compass to mark a circle on the board. Use a jig saw to cut out your table top (or check out Ana White's video on cutting a round top with a circular saw).
Flip the top upside down and center the table base on it. Drill through the top stretchers into the tabletop with 2" screws. Be careful not to drill all the way through the top.

Skip on down to the finishing instructions to finish off your coffee table! This one would look amazing with a rustic stain finish!
2. The Hairpin Leg Table
Shopping List:
36" round table top (or a 4' x 4' plywood project panel 3/4" thick to cut your own top)
Set of 16" hairpin legs
sandpaper and finishing supplies
optional:3/4" plywood edge banding only if you cut a plywood top
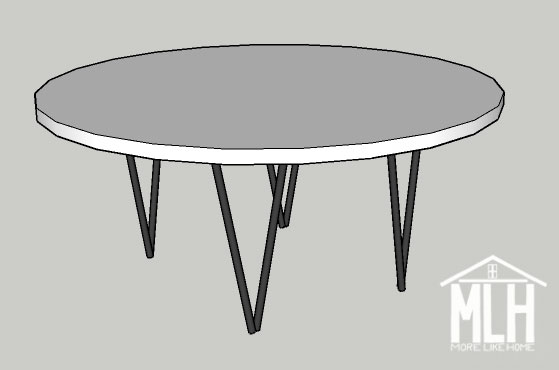
Dimensions: 36" round x 17" tall (but you can easily adjust to any size you want by purchasing a different size top or legs!)
Guys, this almost doesn't even need instructions. If you bought a 3' round top, you're ready to go! If you're cutting your own, start by using a small nail or tack to fasten a piece of string to the center of your plywood. Hold a pencil 18" from the nail and use the string as a compass to mark a circle on the board. Use a jig saw to cut out your table top (or check out Ana White's video on cutting a round top with a circular saw). Attach hairpin legs to the bottom.
Skip on down to the finishing instructions to finish off your coffee table! This one would also look amazing with a rustic stain finish, or painted a crisp white!
3. The Slanted Base Table
Shopping List:
1 - 1x8 @ 8' long
36" round table top (or a 4' x 4' plywood project panel 3/4" thick to cut your own top)
Kreg Jig + 2 1/2" pocket hole screws + 1 1/4" pocket hole screws
wood glue
sandpaper and finishing supplies
optional:3/4" plywood edge banding only if you cut a plywood top
Dimensions are 36" round x roughly 15" tall
Cut List:
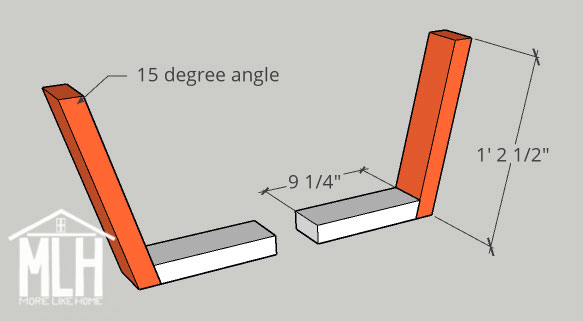
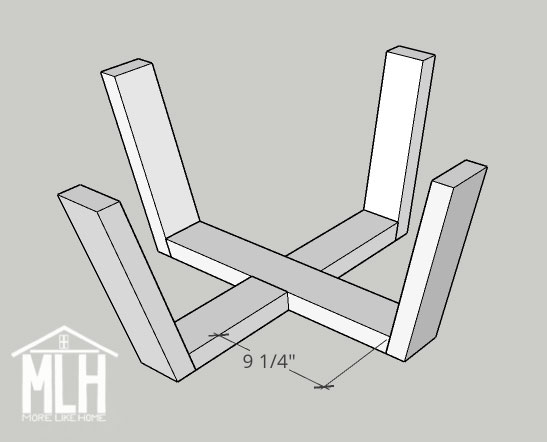
(A) 4 - 2x4 @ ~16" (legs)
(B) 1 - 2x4 @ 22" (stretcher)
(C) 2 - 2x4 @ 9 1/4" (side stretchers)
(D) 36" round top - either purchased or cut from plywood
Cut both ends of the legs (A) at a 15 degree angle. Make sure they are cut parallel (// not / \) and the length of each side of the leg is 14 1/2" long. Cut the ends of the stretcher (B) at a 15 degree angle, this time NOT parallel (\ / not //). Drill pocket holes in both ends of the stretcher and at the top end of each table leg (the holes at the top of the legs need to be set to a 3/4" wood depth!). Use the pocket holes in the stretcher to attach the legs with 2 1/2" pocket hole screws.

Cut one end of each side stretcher (C) at a 15 degree angle and drill pocket holes along both ends of the side stretchers. Use the pocket holes at the angled ends to attach the remaining two legs with pocket hole screws.
Use the pocket holes in the other ends of the side stretchers to attach them to the main stretcher with 2 1/2" pocket hole screws. Make sure the are centered on the main stretcher with 9 1/4" space on either side.
If you bought a 3' round top, you're ready to go! If you're cutting your own, start by using a small nail or tack to fasten a piece of string to the center of your plywood. Hold a pencil 18" from the nail and use the string as a compass to mark a circle on the board. Use a jig saw to cut out your table top (or check out Ana White's video on cutting a round top with a circular saw).
Flip the top upside down and center the table base upside down on top of it. Attach the top using the pocket holes at the top of each leg and the 1 1/4" pocket hole screws (NOT the 2 1/2" screws you used in the other steps!).
Skip on down to the finishing instructions to finish off your coffee table! I love this one with a two-tone finish, but it would also look amazing painted a bold color!
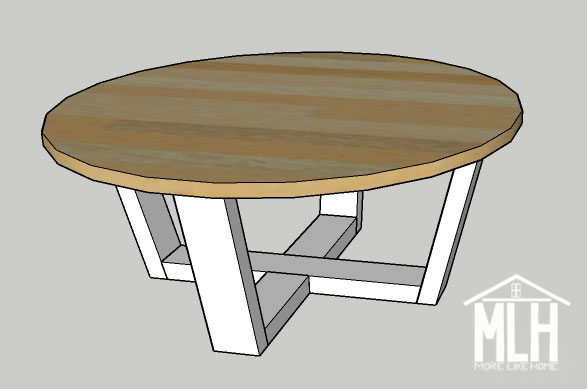
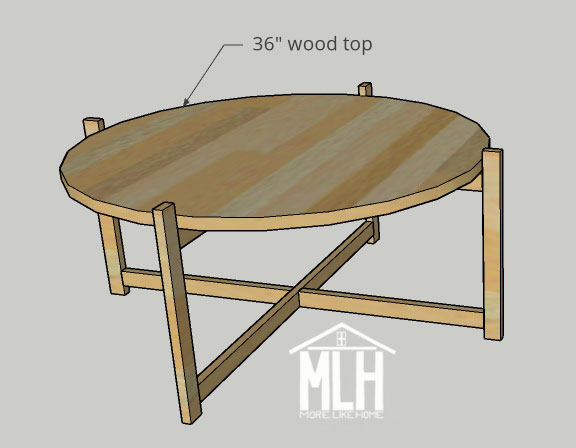
I have no idea what to call this one, but it's my favorite and I love it with all my heart. What would you call this style?? Let me know in the comments, then go on to the shopping list!
Shopping List:
36" round table top (or a 4' x 4' plywood project panel 3/4" thick to cut your own top)2 - 1x2 @ 8' long
1 - 1x2 @ 4' long
Kreg Jig + 1 1/4" pocket hole screws
wood glue
sandpaper and finishing supplies
optional:3/4" plywood edge banding only if you cut a plywood top
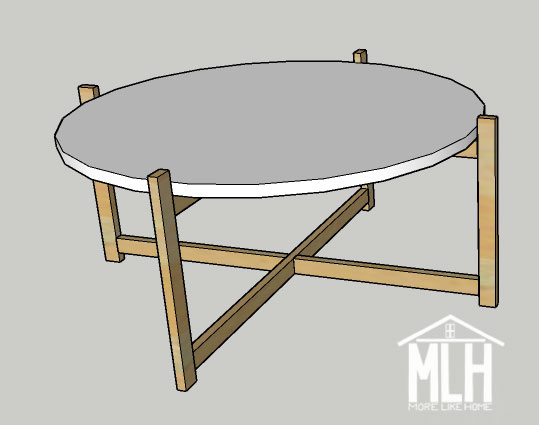
Dimensions: 39" to the outside of the legs x 17 1/4" tall to the top of the legs
Cut List:
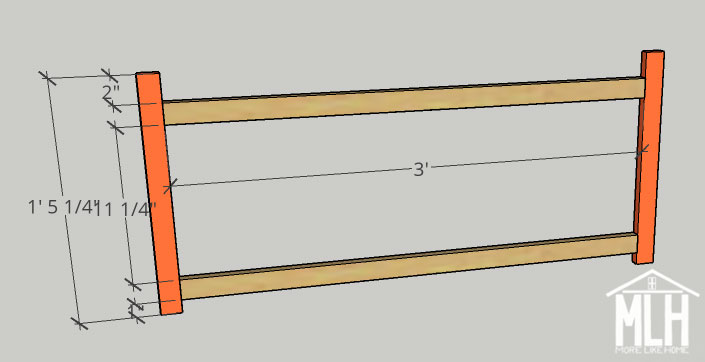
(A) 4 - 1x2 @ 17 1/4" (legs)(B) 2 - 1x2 @ 36" (stretchers)
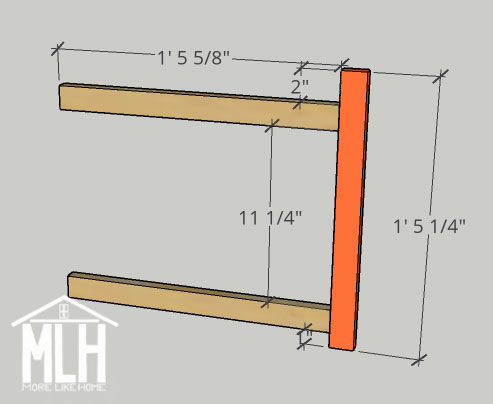
(C) 4 - 1x2 @ 17 5/8" (side stretchers)
(D) 36" round top - either purchased or cut from plywood
Start by attaching two legs (A) to the stretchers (B). One stretcher should be set down 2" from the top of the legs, the other should be set up 1" from the bottom. Make pocket holes in both ends of the stretchers and attach them to the legs with 1 1/4" pocket hole screws.
Attach two side stretchers (C) to each remaining leg. One stretcher should be set down 2" from the top of the legs, the other should be set up 1" from the bottom. Make pocket holes in both ends of the side stretchers, then use the holes at one end to attach them to the legs with 1 1/4" pocket hole screws.
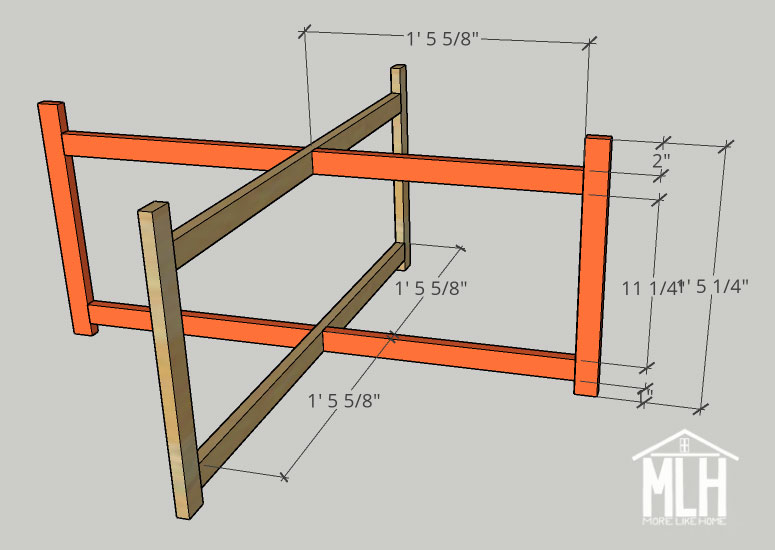
Attach the side sections to the main base. The side sections should be centered on the base with 17 5/8" on either side. Use the pocket holes on the side stretchers to attach them to the main stretchers with 1 1/4" pocket hole screws.
If you bought a 3' round top, you're ready to go! If you're cutting your own, start by using a small nail or tack to fasten a piece of string to the center of your plywood. Hold a pencil 18" from the nail and use the string as a compass to mark a circle on the board. Use a jig saw to cut out your table top (or check out Ana White's video on cutting a round top with a circular saw).
Drill pocket holes along the top edge of the stretcher and side stretchers. Attach the top using 1 1/4" pocket hole screws.
This one is super flexible - it would look great with a rustic stain, painted bright white, or with a two-tone finish (white top with stained base)!
To finish, fill any visible holes with wood filler then sand everything down really well. This is the most important step for a professional finish! Start with a rough sand paper, then go over everything with a medium paper, then again with a fine paper. Once it's super smooth, finish it with whatever paint or stain and sealer you like. Also note that the edges of plywood will not take stain or paint as well. It's a more obvious difference with stain, but even with paint the edges probably won't quite match the rest of the table. If you made a plywood top, you can solve this problem by applying 3/4" plywood edge banding. It's usually an iron-on strip of thin wood that will stain to match the plywood top. Honestly, though, I usually just roll with the regular plywood edge and it doesn't bother me since I expect it. But be warned, if you're a bit of a perfectionist you'll probably want the edge banding.
I love to see your finished projects! Tag me on instagram @more.like.home or share them on our facebook page!
Want more plans? Check out the rest of the coffee table series here and all our other building plans here!
The square base table was exactly what I needed to finish off the vision in my head! Concise, easy instructions. Thank you!
ReplyDelete