
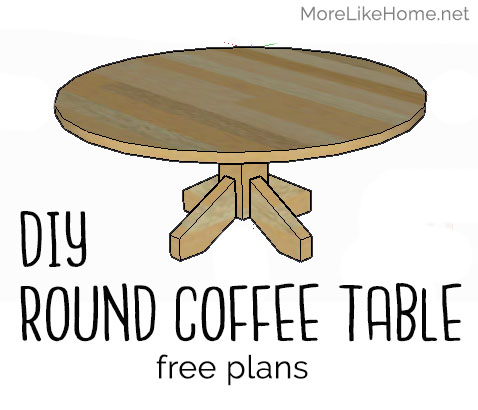
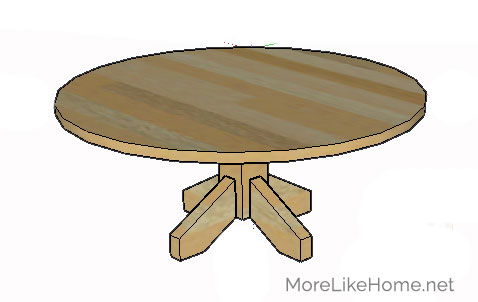
Round coffee tables are a great way to add surface area without interrupting the flow of the room. They work well in any layout, but are especially well-suited with a sectional sofa or any other setup that will involve shimmying around the table to reach your seat. The rounded top means more wiggle room where you need it most, fewer bumped shins, and no sharp corners for a toddling baby! Plus, from a design standpoint, the rest of your living room furniture is probably pretty square and a round table is a great way to break up that boxiness and add a little interest. Have I convinced you yet? Good. Let's get started!
Measure twice, cut once (seriously, though). Use glue in every step (be careful to clean up any drips, because they can mess up your finish at the end!). Read through all the instructions before you begin. Use 2"" screws unless otherwise indicated. Pre-drill and countersink all your screws. Be safe, have fun, and let me know if you have any questions! Please note I have not built from these plans myself (you might be the first!), so double check everything as you go.
Shopping List:
1 - 2x4 @ 8' long
12" long scrap of 4x4 (or buy the shortest one you can find, not pressure treated)
36" round tabletop OR a 4'x4' plywood project panel 3/4" thick
Kreg Jig + 2 1/2" pocket hole screws
2" wood screws
wood glue
sanding and finishing supplies
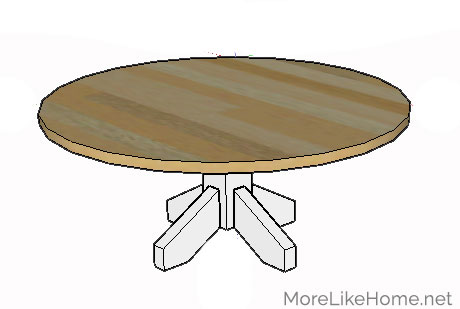
Dimensions: 36" round top x 15" tall
You can change the size by purchasing or cutting a different size top. Make sure you adjust the supports appropriately. If you make the top larger, you'll probably want to make the feet longer, too, for more balanced support. You can adjust the height by cutting the leg longer or shorter.
Cut List:
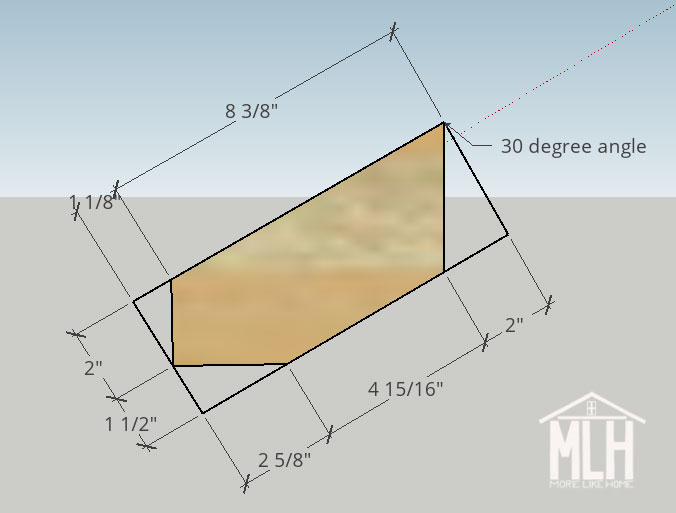
(A) 4 - 2x4 @ ~11" (feet)
(B) 1 - 4x4 @ 11 1/2" (leg)
(C) 4 - 2x4 @ 12" (supports)
(D) 1 36" round tabletop (either purchased or cut from plywood)
Start by cutting all four feet (A). Cut the ends at a 30 degree angle. Make sure they are cut parallel, and that each side measures 8 3/8". Then cut the bottom off the foot off flat where it will rest on the ground. You should end up with something like this:
Attach one foot on each side of the leg (B). Each foot should be flush with the bottom of the leg and centered on the side. Use a Kreg Jig to make pocket holes in the end of each foot and use 2 1/2" pocket hole screws to attach them. I would do two pocket holes on one side and one centered on the other side for added stability.

Before you attach the support boards (C), you can trim the outside ends off at a slight angle if you'd like. They don't need to be exact, it just adds to the style and keeps things looking neat and tidy. If you don't have a good tool for that job, don't worry about it. They will work just as well without trimming. Use a Kreg Jig to make pocket holes on the inside ends of the support boards and attach them flush with the top of the leg.

Now about that top. If you bought a 3' round top, you're ready to go! If you're cutting your own, start by using a small nail or tack to fasten a piece of string to the center of your plywood. Hold a pencil 18" from the nail and use the string as a compass to mark a circle on the board. Use a jig saw to cut out your table top (or check out Ana White's video on cutting a round top with a circular saw).
Flip the top upside down and center the table base on it. Drill through the support boards into the tabletop with 2" screws. Be careful not to drill all the way through the top.

To finish, fill any visible holes with wood filler then sand everything down really well. This is the most important step for a professional finish! Start with a rough sand paper, then go over everything with a medium paper, then again with a fine paper. Once it's super smooth, finish it with whatever paint or stain and sealer you like.
I love to see your finished projects! Tag me on instagram @more.like.home or share them on our facebook page!
Want more plans? Check out the rest of the coffee table series here and all our other building plans here!
No comments:
Post a Comment