
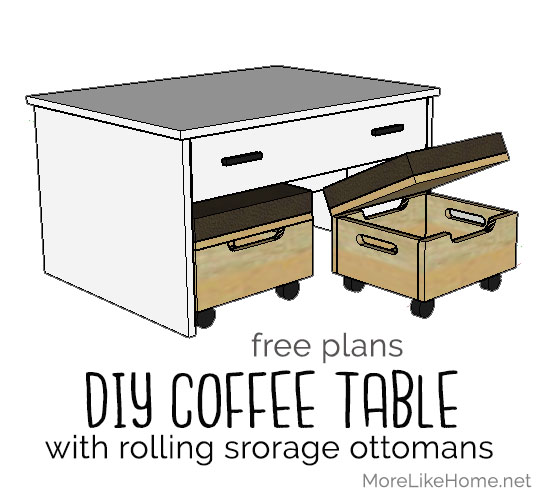
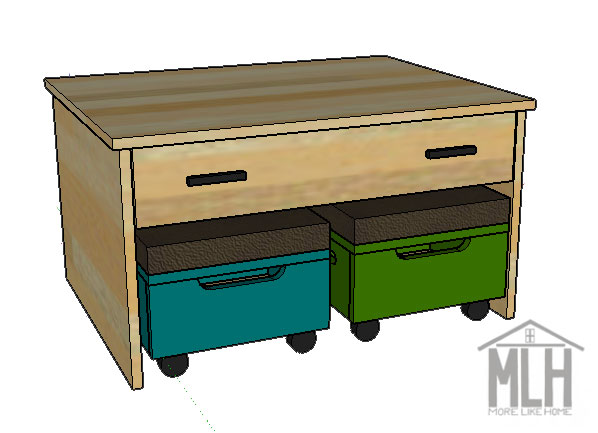
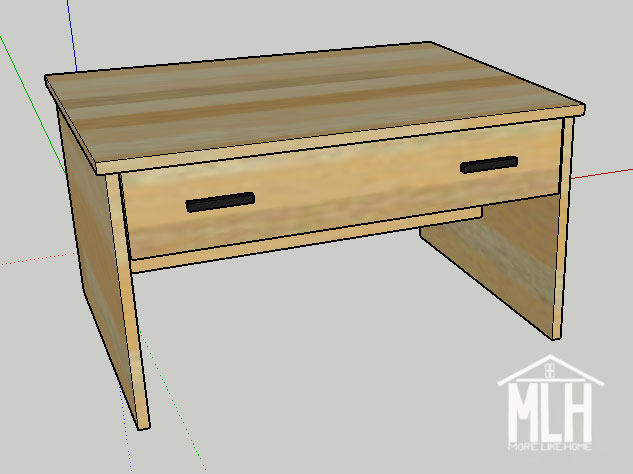
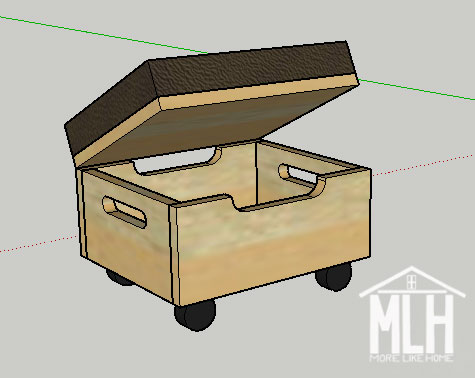
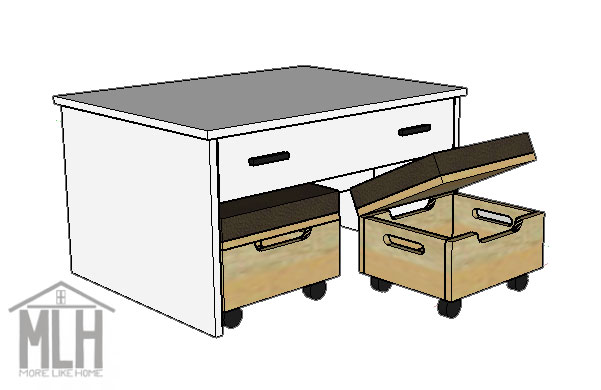
Some of you mentioned that your kids eat around the coffee table or that you need storage for toys (or games, or art supplies). So I decided to take on all those needs in one powerhouse coffee table. This coffee table features two storage drawers (one accessed from each side of the table) along with four small rolling ottomans with their own hidden storage. Each little ottoman is upholstered at the top and makes a perfect little kid seat!

The seats roll out on casters and the lids lift with hinges. If you have multiple kids, you could give them each their own ottoman to keep their own things in when it's time to clean up! The long drawers are perfect for shared items like art supplies or train tracks. If you're anything like our family, we love having toys around the main areas of the house but we also like to hide them out of sight at the end of the day (mama needs a little visual breathing room, thankyouverymuch). This coffee table is perfect for that!
Measure twice, cut once (seriously, though). Use glue in every step (be careful to clean up any drips, because they can mess up your finish at the end!). Read through all the instructions before you begin. Use 1 1/4"" screws unless otherwise indicated. Pre-drill and countersink all your screws. Be safe, have fun, and let me know if you have any questions! Please note I have not built from these plans myself (you might be the first!), so double check everything as you go.
Shopping List:
1 sheet 3/4" plywood
1 - 4' x 2' project panel 1/4" plywood
2 - 1x4 @ 8'
3 - 1x6 @ 8'
1 1/4" wood screws
finishing nails
3/4" plywood edge banding
16 casters (2" total height or smaller)
4 drawer pulls (4 more for ottomans if you don't want to cut notches)
2 sets of 10" full extension drawer slides
8 hinges (for the ottoman lids, any style you like, but consider a soft-close lid support if kids will be using the ottomans)
1 yard fabric
1 yard batting
4 pieces of 2" thick foam 11 1/2" x 13 1/2" each
heavy duty stapler (not an office stapler!)
Optional: Kreg Jig and 1 1/4" pocket hole screws (Kreg Jig instructions will be in italics)

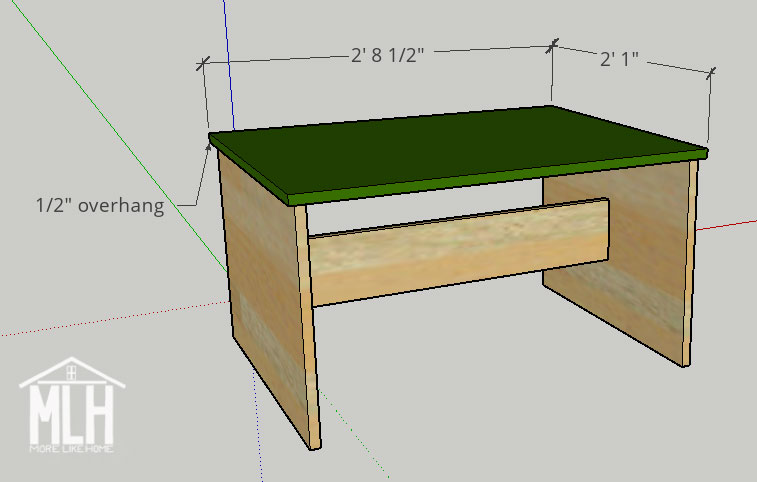
Table Dimensions: 32 1/2" long x 25" wide x 18" tall
Ottoman Dimensions: 13 1/2" long x 11 1/2" wide x 6 1/4" tall (plus foam and casters)
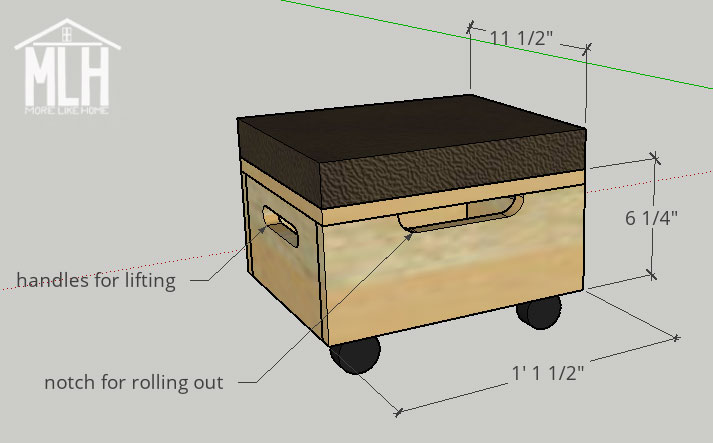
Table Cut List:
(A) 2 - plywood @ 24 x 17 1/4" (sides)
(B) 1 - plywood @ 30 x 5 1/2" (divider)
(C) 1 - plywood @ 32 1/2 x 25" (top)
(D) 4 - 1x4 @ 11" (drawer sides)
(E) 4 - 1x4 @ 27 1/2" (drawer backs)
(F) 1 - thin plywood @ 29 x 11" (drawer bottom)
(G) 2 - 1x6 @ 29 3/4" (drawer front)
Ottoman Cut List (to make all four ottomans):
(H) 8 - 1x6 @ 10" (ottoman sides)
(I) 4 - plywood @ 10 x 12" (ottoman bottom)
(J) 8 - 1x6 @ 13 1/2" (ottoman front/back)
(K) 4 - plywood @ 13 1/2 x 11 1/2" (ottoman top)
Start by attaching the divider (B) to the sides (A). The divider provides stability but also prevents the ottomans from being pushed too far under. It should be centered with 11 5/8" on either side, and be set with 5 3/4" space above and 6" space below. Drill through the sides into the ends of the divider board. If you have a Kreg Jig, make pocket holes along both ends of the divider board and use the pocket hole screws to attach it to the sides.
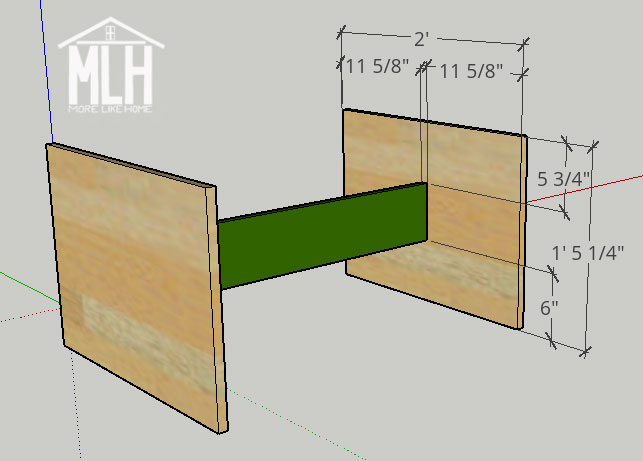
Divider dimensions: 30" long x 5 1/2" tall
Attach the top (C). It should be centered with a 1/2" overhang on all sides. Drill down through the top into the side boards. If you have a Kreg Jig, make pocket holes along the top of both side boards and use pocket holes screws to attach the top. If you want a modern minimalist coffee table, you can stop right here! But I have a hunch you're here for toy storage. So let's keep going...
Build two drawer boxes by attaching two drawer side boards (D) to two drawer back boards (E). Drill through the side boards into the ends of the back boards. If you have a Kreg Jig, make pocket holes along both ends of the back boards and attach the drawer sides with pocket hole screws. You should have a frame like this:
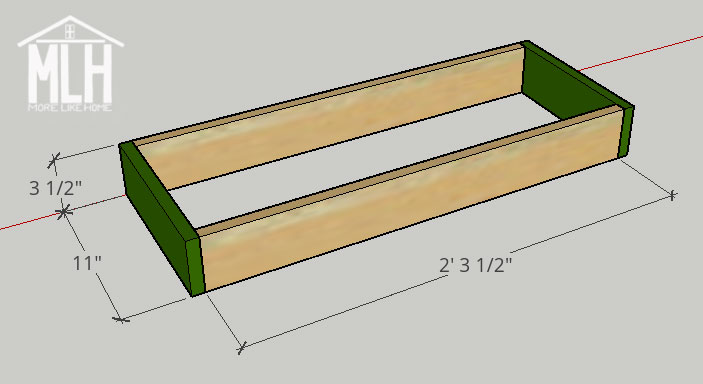
Attach the drawer bottom (F) by drilling up through the bottom into both side and back boards. Repeat to build a second drawer box.

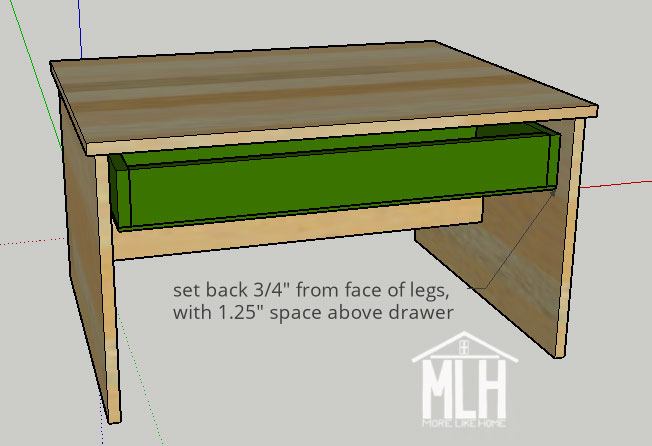
Install the drawer boxes, one on each side, following the instructions for your drawer slides. The drawer box should be set back 3/4" from the face of the legs, and set down 1 1/4" from the table top. Make sure you keep the drawer boxes level.
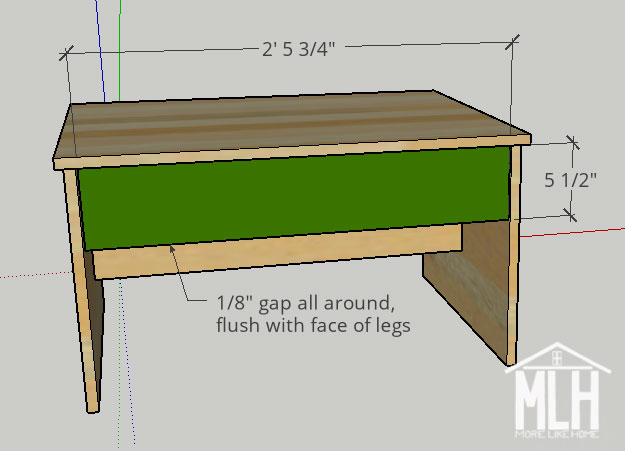
Center a drawer front (G) over each drawer box and center it in the opening with 1/8" gap on both sides and at the top. Attach the drawer front with finishing nails and glue. If you'd like, you can slide the drawer out and drill through the drawer box into the drawer front with a few screws for added stability.
Go ahead and drill holes for your drawer pulls (a Kreg Cabinet Hardware Jig is super handy for installing pulls straight and even!), but don't install them until after you sand and finish the table. The table is done! Again, you can stop here for a simple storage table, or keep moving to make the matching storage ottomans.
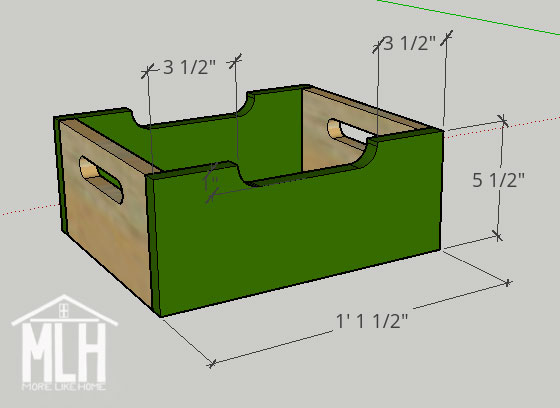
To build each ottoman, start by attaching two ottoman sides (H) to an ottoman bottom (I). Drill through the side boards into the ends of the bottom board. If you have a Kreg Jig, make pocket holes along all four sides of the bottom boards and along the short ends of the side boards for later. Then use the holes along the short ends of the bottom board to attach the side boards with pocket hole screws. It might be handy to cut notched handles in the sides of the ottoman in case you ever carry it around the house, but it's totally not necessary. If you'd like that option, it will be easier to cut them before you start assembling the box. I'd try a 5" opening (with 2.5" space on either side), set down 1" from the top edge. I have instructions for cutting handles and a bunch of photos in my crate nightstand plans to get you started. You could also just use a 1" drill bit to drill finger holes in the side and call it a day. And again, totally not a necessary feature if you don't have the tools or the time!
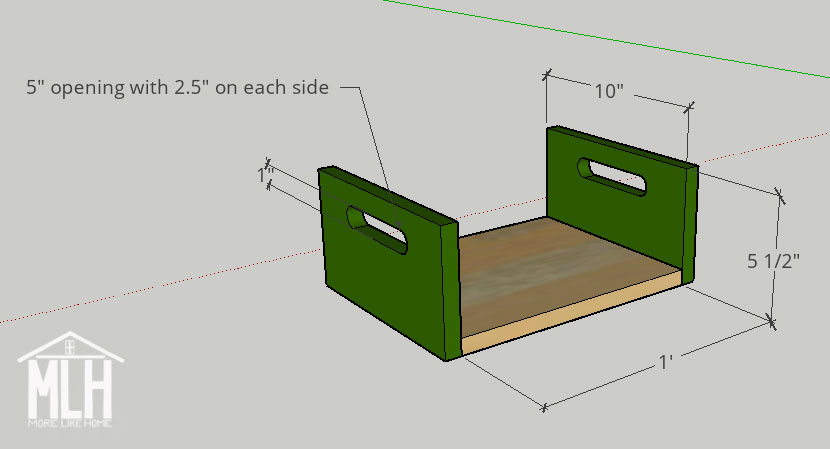
Attach the front and back boards (J) to the ottoman box. Drill through the front/back into the box sides and bottom. If you have a Kreg Jig, use the pocket holes along the bottom and side boards to attach the front and back. Like the sides, you can also cut notches in the front and back. The notches will give you something to grab when you pull it out from under the table, as well as creating finger space to lift the lid easier. Use a jigsaw to cut a little notch about 1" deep at the center of the board. You can also just use a 1" drill bit to drill a finger hole for pulling the ottoman, or attach an extra cabinet knob to the box. Whatever floats your boats, peeps.
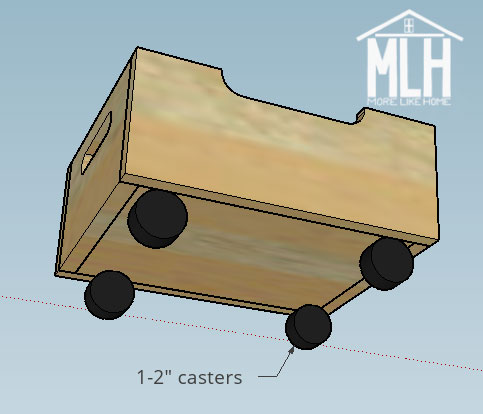
If you opted for drawer pulls instead of cutting notches, go ahead and drill the holes for them. Attach casters to the bottom of each ottoman. Repeat to build three more ottomans.
To finish, fill any visible holes with wood filler then sand everything down really well. This is the most important step for a professional finish! Start with a rough sand paper, then go over everything with a medium paper, then again with a fine paper. Once it's super smooth, finish it with whatever paint or stain and sealer you like. Also note that the edges of plywood will not take stain or paint as well. It's a more obvious difference with stain, but even with paint the edges probably won't quite match the rest of the table. You can solve this problem by applying 3/4" plywood edge banding. It's usually an iron-on strip of thin wood that will stain to match the plywood top. Honestly, though, I usually just roll with the regular plywood edge and it doesn't bother me. But be warned, if you're a bit of a perfectionist you'll probably want the edge banding. All hearts clear? Ok, let's go ahead with the upholstery:
You can buy a piece of foam at Joann fabric, or some people have had good luck buying a foam mattress or mattress topper for less $$ and cutting it down to size.
Far each ottoman top (K), start a stack on the ground with your fabric (face-down), topped with the batting, topped with the piece of foam, topped with the plywood. Wrap the batting around the foam and up onto the plywood, pulling it taught, and staple it in place. Then wrap the fabric up over the batting and staple it in place. You can also tuft the upholstery like I did way back when I built our headboard.

The fabric will be covering the plywood. Sorry this drawing is wrong!
Use the hinges to attach the upholstered tops to the finished boxes. Install the drawer pulls on the drawers (and on the ottomans if applicable).
Slide the ottomans under the table and start stashing those toys!
I love to see your finished projects! Tag me on instagram @more.like.home or share them on our facebook page!
Want more plans? Check out the rest of the coffee table series here and all our other building plans here!
Such a clever idea! These nesting coffee tables are not only stylish but also super functional. Love the mix of storage and design—perfect for small spaces and keeping things organized!
ReplyDeleteSuch a clever idea! These nesting coffee tables are not only stylish but also super functional. Love the mix of storage and design—perfect for small spaces and keeping things organized!
ReplyDelete