
P.S. Check out the rest of our free DIY Desk Plan Series here!
In fact when we started our house hunt I was specifically looking for
Mid Century Modern homes to tour. Nothing turned up in our budget with
enough bedrooms, and we ended up finding a beautiful old farmhouse (my
other favorite style), but I still can't pass a mid-century home without
a wistful sigh.
Shopping List:
1 - 1x3 @ 10'
1 - 1x4 @ 10'
1 - 1x4 @ 6'
1 - 1x6 @ 4'
1 - 2x2 @ 10' (OR 2 @ 6' if your store doesn't carry 10' long)
1 sheet 1/4" plywood
2 sheets 3/4" plywood
6 sets 16" drawer slides (full extension slides are worth the splurge!)
optional: wood veneer edge tape (if you don't want the raw plwyood edges exposed when you are done
1 1/4" wood screws
2 1/2" wood screws
Kreg Jig & 1 1/4" pocket hole screws (optional but helpful!)
wood glue
sand paper and finishing supplies
desk with cupboard doors instead - read through to the end of the plans for details and an updated shopping list for this modificiation!
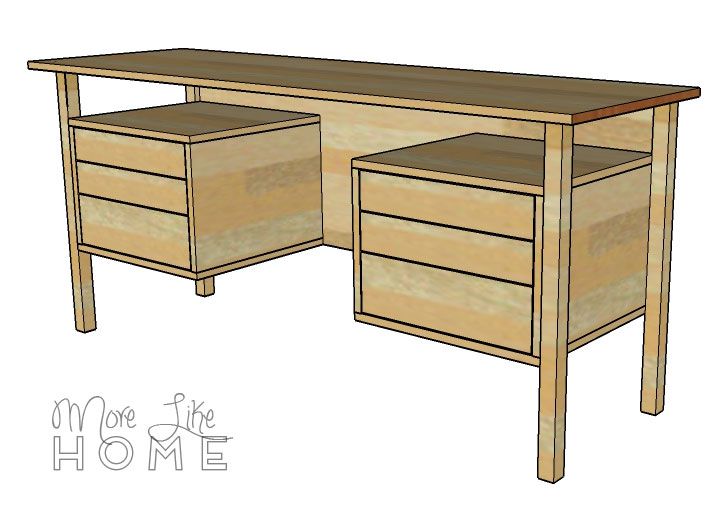
Cut List:
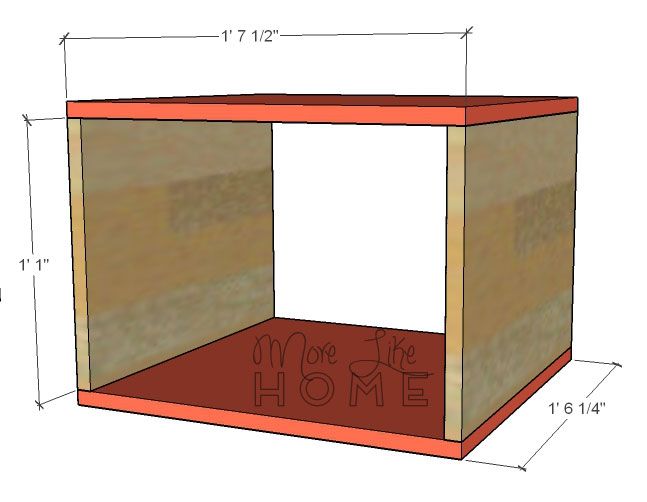
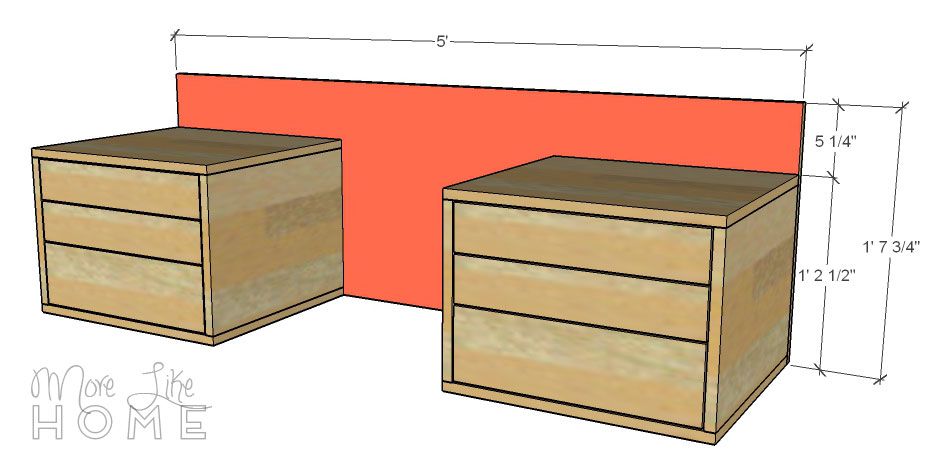
(A) 4 - 3/4" plywood @ 19 1/2" x 18 1/4" (box top/bottom)
(B) 4 - 3/4" plywood @ 13" x 18 1/4" (box sides)
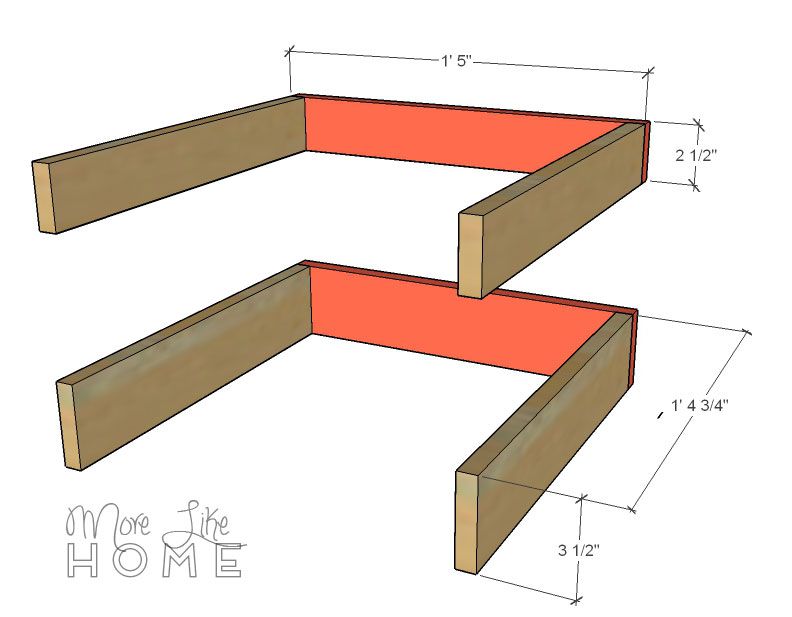
(C) 8 - 1x3 @ 16 3/4" (short drawer side)
(D) 4 - 1x3 @ 17" (short drawer back)
(E) 4 - 1x4 @ 16 3/4" (tall drawer side)
(F) 2 - 1x4 @ 17" (tall drawer back)
(G) 6 - 1/4" plywood @ 17" x 17 1/2" (drawer bottom)
(H) 4 - 1x4 @ 17 3/4" (short drawer front)
(I) 2 - 1x6 @ 17 3/4" (tall drawer front)
(J) 1 - 3/4" plywood @ 60" x 19 3/4" (back)
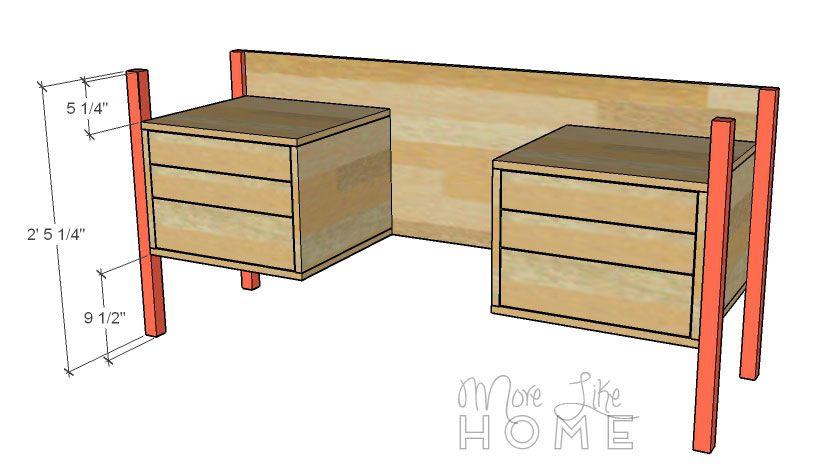
(K) 4 - 2x2 @ 29 1/4" (legs)
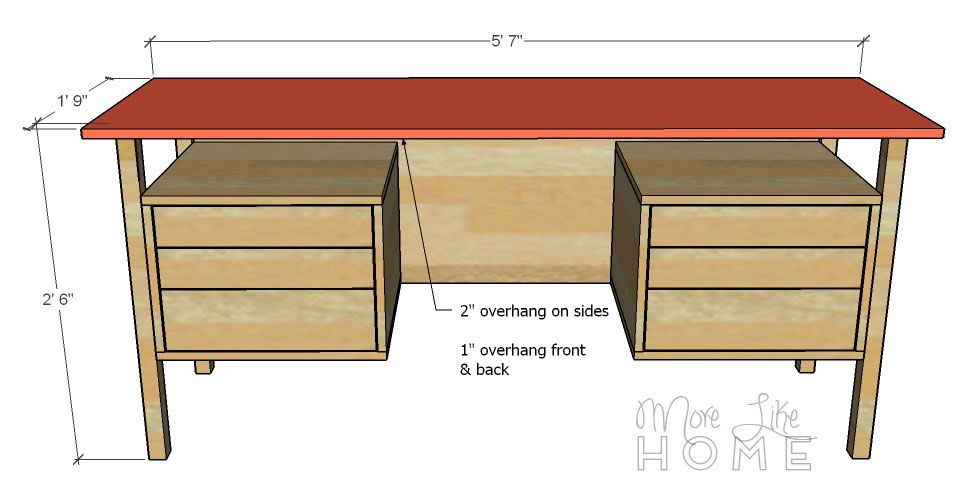
(L) 1 - 3/4" plywood @ 67" x 21" (top)
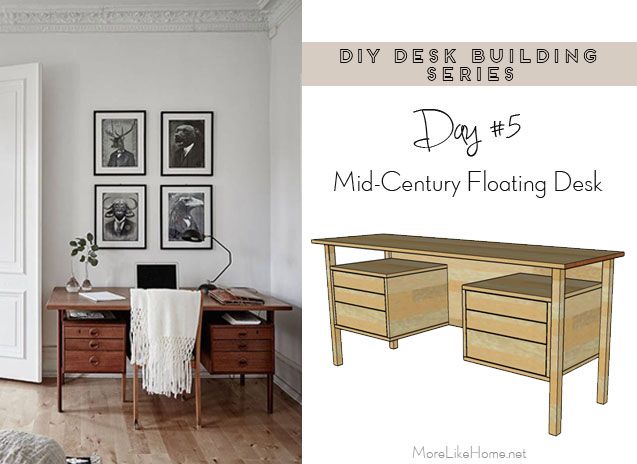
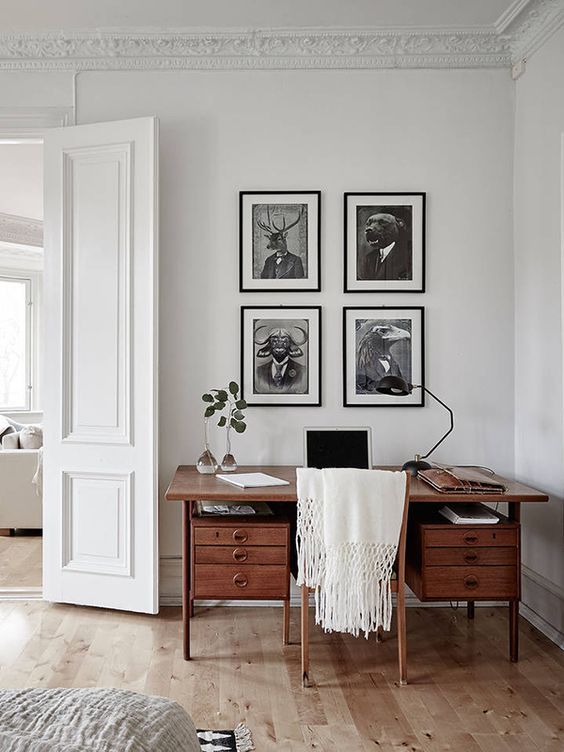
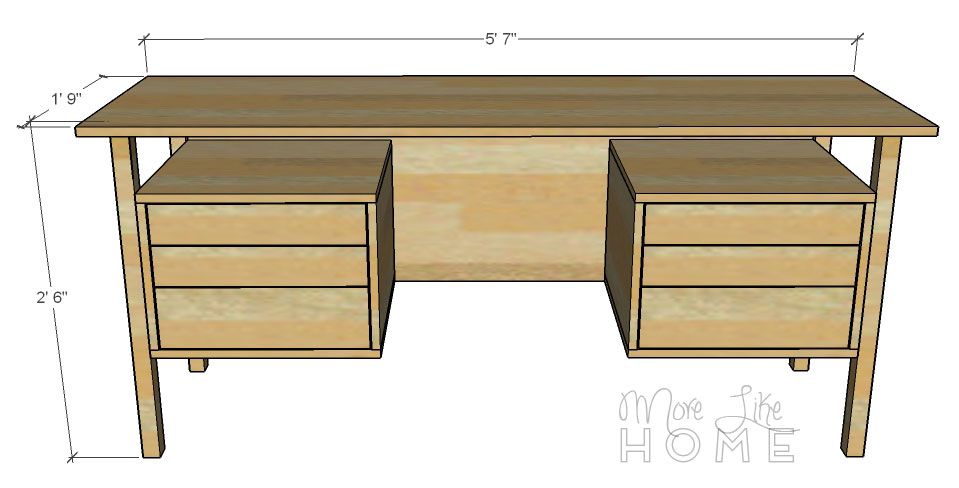
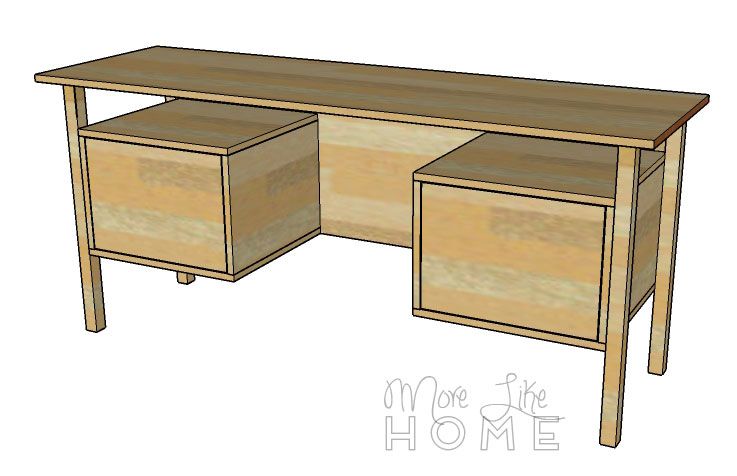
Dimensions: 67" wide x 21" deep x 30" high
Measure twice, cut once (seriously, though). Use glue in every step. Read through all the instructions before you begin. Use 1 1/4" screws unless otherwise indicated. Pre-drill and countersink all your screws. Be safe, have fun, and let me know if you have any questions!
Start by building two boxes using the top/bottom (A) and side pieces (B). Use a Kreg Jig or drill through the top/bottom boards into the side pieces.
Then build the drawer boxes. For each "short" drawer box, attach two short drawer sides (C) to a short drawer back (D). For each "tall" drawer box, attach two tall sides (E) to to a tall back (F). You'll build four of the "short" boxes and two of the "tall" boxes. Use a Kreg Jig, or drill through the back boards into the ends of the side boards.
Attach a drawer bottom (G) to each drawer box by drilling up through the bottom of the plywood into the sides and back of the drawer box.

Install the drawers into the boxes you built.
*Note: I drew the plans to show installing the drawer boxes now because you'll have more room to work without the back attached. HOWEVER, if you have trouble keeping your box square, you should skip ahead and attach the boxes to the back board, then come back and install the drawer boxes.
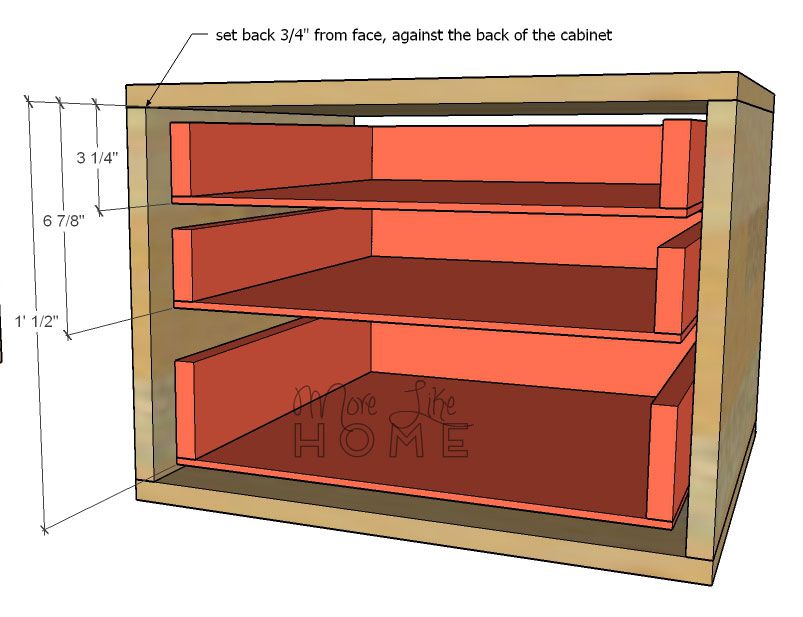
Each box will have two short drawer and one tall drawer. The drawer boxes should be set back 3/4" from the face of the box, and flush with the back edge of the box. Make sure they are level!
Center a drawer front (H and I) over each drawer box, with a 1/8" gap all around. Attach the fronts to the drawer boxes with finishing nails. Optional: you can reinforce this with a Kreg Jig.

Attach the back board (J) to the drawer box sets. The should be flush at the bottom and outside edges. Drill through the back board into the sides, top, and bottom edges of the boxes (or use a Kreg Jig to make pocket holes around the back edges of the boxes and attach it that way.. If you have a Kreg Jig, also put pocket holes along the sides of the back board to attach it to the legs later, and a few along the top edge to attach the desktop.
Attach the legs (K) to the sides of the desk. If you have a Kreg Jig, put pocket holes at the top of each leg for attaching the top later.
The front legs are flush with the front face of the boxes. There is 5 1/4" of leg above the box and 9 1/2" of leg below the box. Attach the front legs by drilling through the inside of the drawer box out into the legs.
The back legs are flush with the back edge of the plywood. Attach them to the boxes by drilling out through the inside of the box into the legs, just like you did with the front legs. It would also be a good idea to attach the legs to the back board, which can be done using the pocket holes you put along the edges of the plywood OR by drilling through the outside face of the legs into the edges of the back board with 2 1/2" screws (this will be the trickier option, but cheaper than buying a Kreg Jig if you don't have one).
Finally, attach the top (L) to the desk frame. Use the pocket holes you put around the top of the legs and the top of the back board, OR drill down through the top into each leg and the back board (I love the Kreg Jig for jobs like this because you won't have any holes to fill in the top when you are done!)
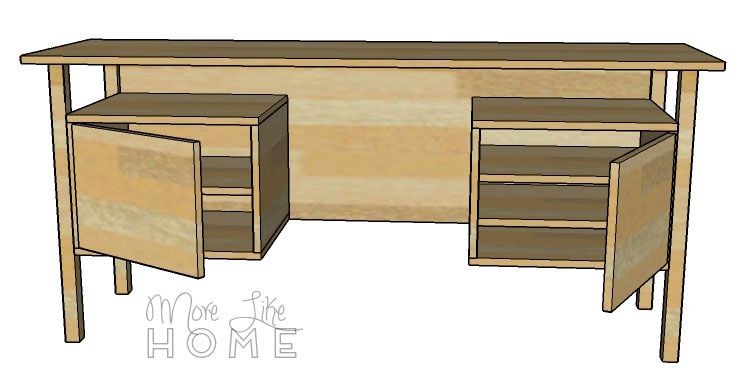
For one more option (which is also much easier than drawers if you're a beginner builder), you could skip the drawers and build simple cupboards instead. This will also save quite a bit of money on the project because this is the shopping list instead:
1 - 2x2 @ 10' (OR 2 @ 6' if your store doesn't carry 10' long)
2 sheets 3/4" plywood
2 - sets of hinges
optional: wood veneer edge tape
1 1/4" wood screws
2 1/2" wood screws
Kreg Jig & 1 1/4" pocket hole screws (optional but helpful!)
wood glue
sand paper and finishing supplies
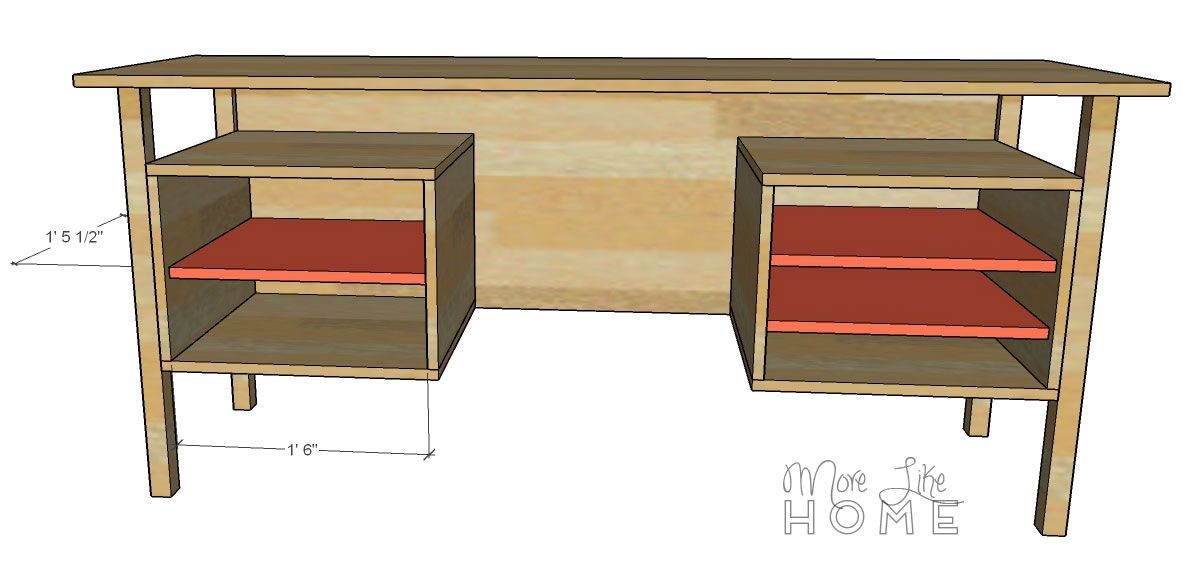
For shelves/doors instead of drawers (skip cuts "C" through "I" and do this instead):
(M) 3 - 3/4" plywood @ 17 1/2" x 18" (shelves)
(N) 2 - 3/4" plywood @ 12 3/4" x 17 3/4" (doors)
Install shelves (M) into the cabinets at whatever heights you like. Just make sure they are level. You can make pocket holes in the bottom of the shelves with a Kreg Jig and use those to attach the shelves to the sides and back, or drill through the outside of the box into the sides of the shelves with regular wood screws.
Install the doors (N) using your hinges. The doors should be centered in the opening with a 1/8" gap all around.

To finish, fill any holes with wood filler then sand everything down really well. This is the most important step for a professional finish! Start with a rough sand paper, then go over everything with a medium paper, then again with a fine paper. If you don't like seeing unfinished plywood edges, use a wood veneer edge tape to cover the edges (you heat-set the tape with an iron). Once everything is super smooth, finish the desk with whatever paint or stain and sealer you like. I'd love to see this in a rich brown stain like the sample photo! What color would you do?
That's it! Come back tomorrow for another DIY desk plan, and check out the full series here!
)
This desk looks great! I was wondering what kind of wood you recommend using? Thanks!
ReplyDeleteHi! I always go for pine because it's cheapest and easy to work with. Hope that helps! :)
Delete