
P.S. Check out the rest of our free DIY Desk Plan Series here!

This folding desk is also great for multi-purpose rooms (like tucking a desk area into a bedroom or living room), and makes a handy homework station for the kids.
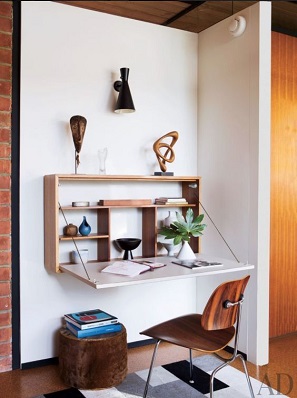
I love the simple and clean style of the inspiration photo above, but I'm also digging this smaller-scale twist with a tapered front and the shelf above (we'll be talking about add-ons like this in a few days!).
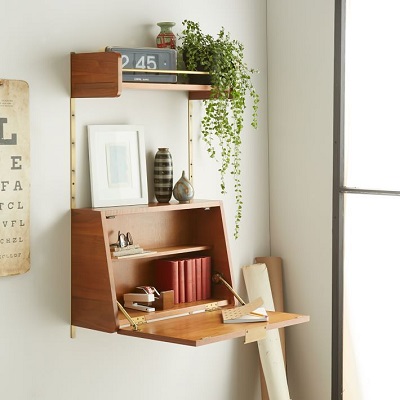
image via pinterest - find plans to build something similar here.
Either way, this desk folds up to a slim profile to stay out of your way. You can leave it plain, attach a piece of artwork to the front, or even stencil the front (check out Royal Design Studio for some sweet stencils, or try making your own!).
Shopping List:
3 - 1x6 @ 8'
1 - 1x4 @ 4'
1/2" plywood 34 1/4" x 17 3/4"
2 hinges (something like this for an inset door)
a latch or magnetic closure
Either:
4 eye hooks + 48" of chain or rope (plus a cutter to adjust the length)
-OR-
2 adjustable lid supports
Cut List:
(A) 2 - 1x6 @ 36" (top/bottom)
(B) 2 - 1x6 @ 18" (sides)
(C) 1 - 1x6 trimmed to 5" wide @ 34 1/2" (trim)
(D) 1 - 1x6 trimmed to 4 3/4" wide @ 34 1/2" (shelf)
(E) 2 - 1x6 trimmed to 4 3/4" wide @ 12 1/2" (dividers)
(F) 2 - 1x6 trimmed to 4 3/4" wide @ 10" (side shelves)
(G) 1 - 1x4 @ 13" (center mount)
(H) 2 - 1x4 @ 10" (side mount)
(I) 1 - 1/2" plywood @ 34 1/4 x 17 3/4" (front)
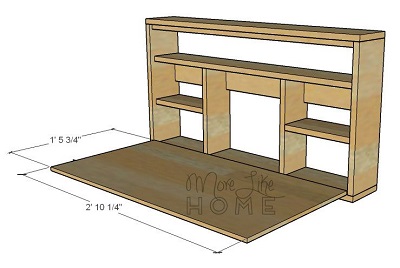
Dimensions: 36" wide x 19 1/2" tall x 5 1/2" deep (if you use 1x8s instead it will be 7 1/4" deep)

Measure
twice, cut once (seriously, though). Use glue in every step. Read
through all the instructions before you begin. Use 1 1/4" woo dscrews
unless otherwise indicated. Pre-drill and countersink all your screws.
Be safe, have fun, and let me know if you have any questions! Please
note I have not built from these plans myself (you might be the first!),
so triple check everything as you go to make sure it works out.
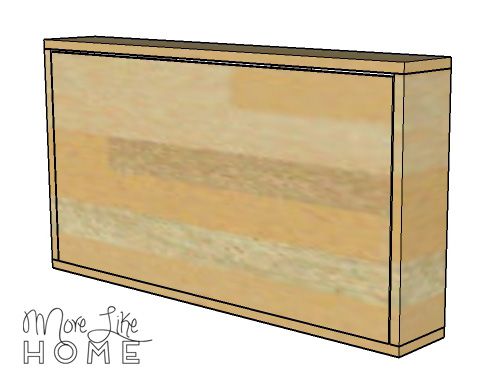
Attach the top and bottom boards (A) to the side boards (B). Use the Kreg Jig to make pocket holes along the top and bottom of the sides, then use 1 1/4" pocket hole screws to attach the sides to the top and bottom. If you don't have a Kreg Jig, you can drill through the top and bottom boards into the ends of the side boards with 1 1/4" wood screws.

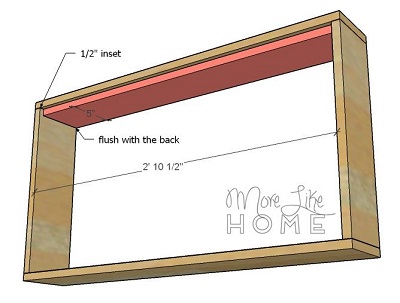
Attach the trim board (C) under the top board. Remember this board should be trimmed to just 5" wide. Line it up flush with the back edge of the frame, which will leave it inset 1/2" from the front. Attach it to the top board with wood screws (be careful not to countersink the screws too far or they will poke through the top).
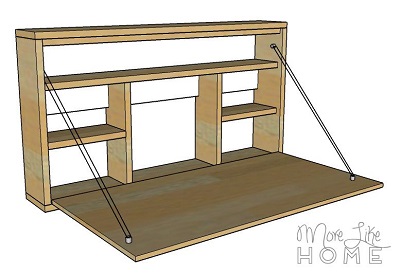
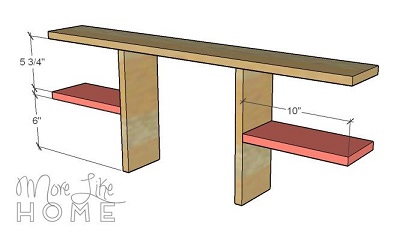
Trim the shelf and support boards to 4 3/4" wide, and if you're using a Kreg Jig drill pocket holes along both ends of each board. Start by attaching the dividers (E) to the long shelf (D). The easiest way to get the right placement is to use the side shelves (F) as spacers from the ends of the long shelf. Use pocket holes along the top of the dividers to attach them with pocket hole screws. If you don't have a Kreg Jig, you can drill down through the shelf into the ends of the dividers.

Attach the side shelves (F) to the dividers. Use pocket holes along the ends of the shelves, or drill through the dividers into the ends of the shelves. I drew the shelves spaced up 6" from the bottom of the divider, but you can do them at any height you like. Also feel free to add more shelves or omit them completely! DIY, guys!
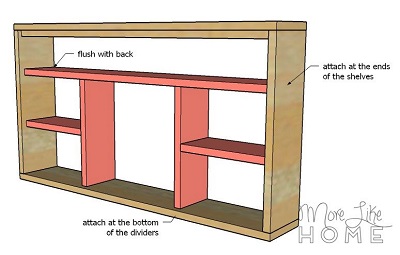
Fit the shelving unit into the box and attach it using the pocket holes in the ends of each shelf and divider (you'll need a small drill to get into the side shelves). Or skip the Kreg Jig and drill through the sides and bottom into the end of each shelf and divider. Make sure the unit is flush with the back edge of the frame.
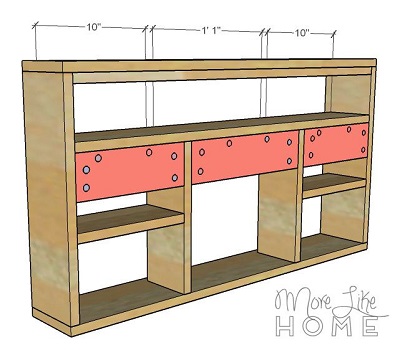
Attach the mounting boards (G & H) into the until. Drill pocket holes along the sides and top of each board, and use the 1 1/4" pocket hole screws to attach them flush with the back edge. When you hang the desk, you'll drill through these mounting board into studs.
Cut the desk front (I) from your piece of plywood.
Set it into the front of the desk to be sure it fits.
You may want to go ahead and finish the unit and the front separately so you don't have to work around the hinges and supports. To finish, fill any holes with wood filler then sand everything down really well. This is the most important step for a professional finish! Start with a rough sand paper, then go over everything with a medium paper, then again with a fine paper. Once it's super smooth, finish it with whatever paint or stain and sealer you like.
Center it with a 1/8" gap all around and attach it with your hinges.
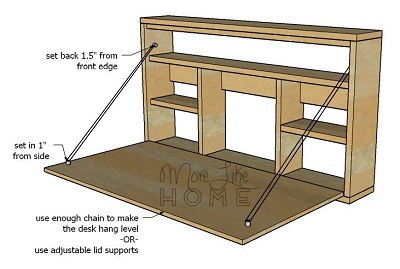
Open the front and install your support of choice. Use eye hooks and chain or rope to mimic the look of the original, or you can use adjustable lid supports like these. Whatever you choose, make sure the front hangs level so you have an even work surface!
Another finishing option (if you want to hide the mounting boards for a cleaner look) is to paint the mounting boards the same color as your walls. They'll blend in and your desk will look lighter and less bulky.
Attach a hook closure to the front to keep your desk closed when not in use (or you could cut a notched finger-pull in the top and do a magnetic closure like this desk).
That's it! Come back tomorrow for another DIY desk plan, and check out the full series here!
)
WHERE HAVE YOU BEEN ALL MY LIFE??? This is my favorite so far!
ReplyDeleteAnd no drawer slides, so it's even better!! They are the worst.
DeleteJust FYI that your cut list shows the sides at 8" when I believe they should be 18".
ReplyDeleteNice plans - I'm in the middle of building it now.
Sure enough! Thanks so much for pointing that out, I just fixed it. I'd love to see how your desk turned out if you have any photos to share! You can share them on our facebook page or email them to me at morelikehome (at) gmail. :)
Delete
ReplyDeleteHow do you mount this on the wall?
Use the mounting boards (pieces G + H). Drill straight through those into the wall and use 3" screws to attach it to the wall. Use a stud-finder to make sure you hit studs. If you go into drywall without hitting the studs it might rip right out of the wall!
DeleteI want to make this but would like the inside storage to be 8 inches instead of 4 3/4 (which I understand these to be). I am unsure of how to modify this properly.
ReplyDeleteIt seems that for everything to fold up flush, we are deducting 1.5 inches to allot for the thickness of the 1x6 pieces? Am I on the right track?
Are you talking about adjusting the depth? If so you'll need the trim piece to be 1/2" narrower than the frame, and the shelf and divider pieces to be 3/4" narrower than the frame.
DeleteSo if you want the depth of the shelves/dividers to be 8", you will need the trim piece to be 8 1/4" and the frame to be 8 3/4". Does that answer your question?
What type of plywood do you use?
ReplyDeleteHi! For projects like this I use sanded plywood because it give a much nicer finish. I avoid structural or sheathing plywood because, although it's cheaper, it's super rough and tends to have really large knot holes that make it very difficult to get a smooth finished project. And I get the standard sanded plywood, I don't splurge for hardwoord or anything. Hope that helps!
DeleteHow is the plywood secured on the bottom? Are there hinges as well as the cable? What kind of hinges?
ReplyDeleteHi! Yes you'll need hinges as well. Cabinet hinges for inset doors should do the trick (something like this https://amzn.to/3lyj1HZ)
DeleteHow much would it cost to build this
ReplyDeleteHi! The price can vary depending on your location, what type of wood you choose, etc. At my local store I would expect to pay around $45 for basic lumber (not hardwood). You'll also need to buy things like screws, hinges, the other hardware listed, and finishing supplies, but again those prices can vary quite a bit depending on what you choose. Hope that helps!
DeleteHow much weight can the writing surface take with the chain/rope. I'm worried if my 13 or 4 year old were to lean on it or rest his or head on it the cable/chain would pull out.
ReplyDeleteHi! I haven't tested this for weight so I can't vouch for what it can hold. But if you're worried about the chain pulling out you could try eye bolts instead of eye hooks (something like this https://amzn.to/30TorVY). You would drill all the way through and use nuts to secure the bolts from the outside. The downside is the nuts would be visible when it's closed, but you wouldn't have to worry about them pulling out. At that point the weight limit would be dependent on the quality of chain and hinges you use. Hope that helps! :)
DeleteHow many 1x6 and 1x4 boards did you purchase? Did you make the cuts yourself? If so, what tools did you use? Is is possible to make those cuts without a circular saw?
ReplyDeleteHi! Great question, I just updated the post to include this info. You'll need two 1x6 boards that are 8' long and one 1x4 board that is 4' long. I make cuts myself with a miter saw. You *could* do it by hand with a manual saw if you don't have access to a power saw. It will take some time and sweat, but it's doable if you don't mind putting in the work. :)
DeleteHow many 1x6 and 1x4 boards did you purchase? Did you make the cuts yourself? If so, what tools did you use? Is is possible to make those cuts without a table saw?
ReplyDeleteDo you have the metrics in centimeters??
ReplyDeleteI don't, but you could try the calculator on this site to convert the measurements: https://www.thecalculatorsite.com/conversions/common/inches-cm.php
DeleteHello, do you know a website to convert the metrics in centimeters ? Or do you have them yourself ?
ReplyDeleteI don't have the measurements, but there are lots of free calculators you can use like this one: https://www.thecalculatorsite.com/conversions/common/inches-cm.php
DeleteOr you can use a calculator and multiply each inch measurement by 2.54 to get the cm equivalent. :)
will the chain interrupt the closer of the desk???????
ReplyDeleteHi! There will be 1/4" of clearance between the shelves and the desk front when it is closed, so as long as you use a narrow chain it should fit!
DeleteIf you want to use something thicker, you can reduce the depth of the shelves for extra clearance. :)
DeleteFirst, I wanted to say thank you. I built this desk for my daughter over this past weekend. One thing, is that the supplies list is slightly incorrect with only calling the need for two 1x6x8's and it should be three.
ReplyDeleteThank you so much for bringing that up! I'll fix it now! :)
Delete