
P.S. Check out the rest of our free DIY Desk Plan Series here!
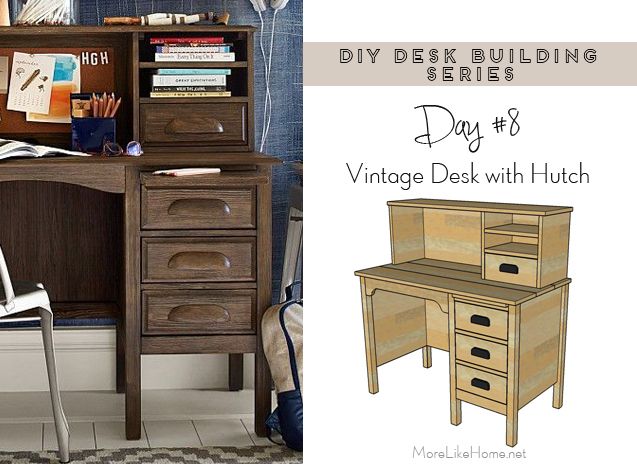
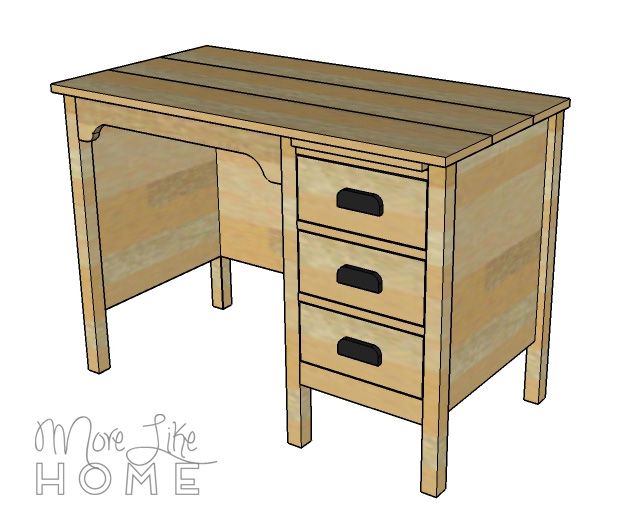
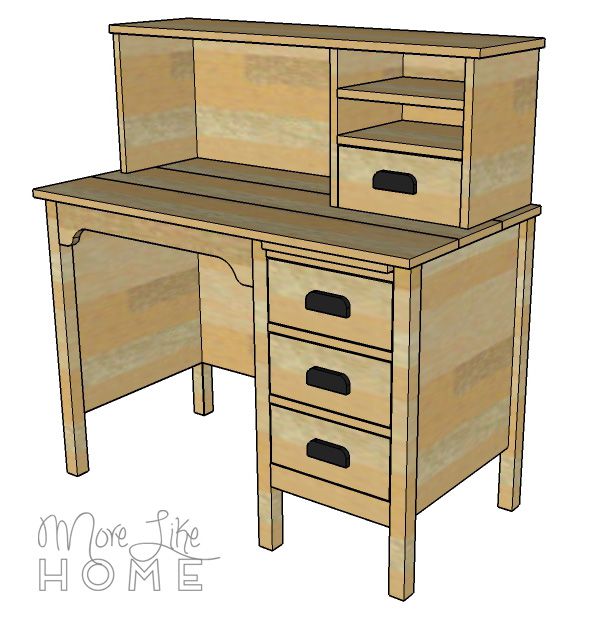
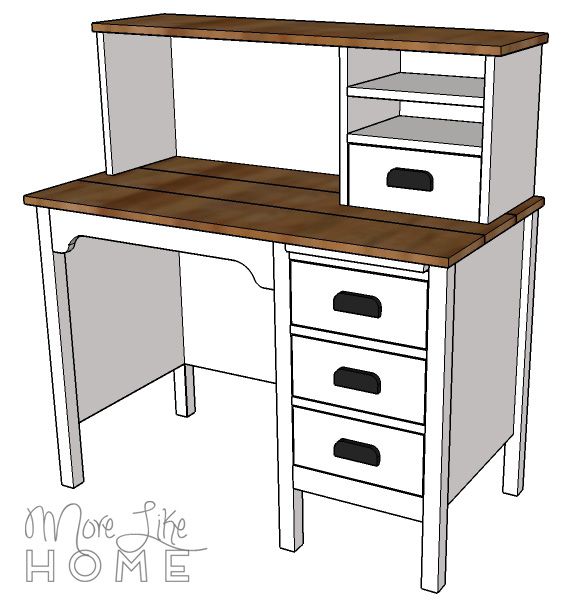
This classic school desk is packed with vintage charm, including a hutch with additional storage and a pull-out work surface. It's perfect to tuck into a kids room for homework, art, or legos, but it's not just for kids. It's beautiful enough to add workspace into a living room, serve as a drop-zone in an entryway, or even a spiffy potting bench on the back deck!
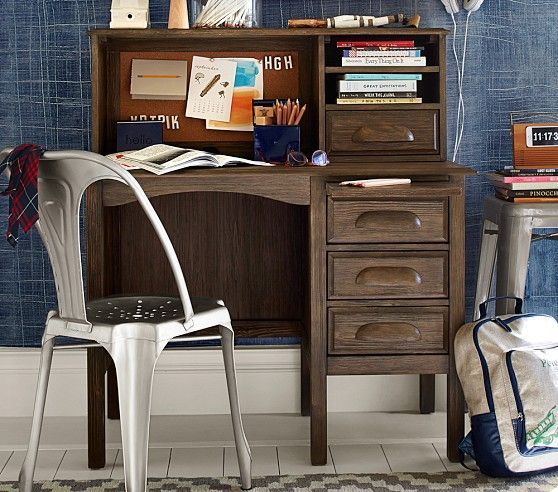
The hutch is a separate piece, so you can skip it if you want a regular flat desk (but... you're probably going to want the hutch. Because cute.)
Measure twice, cut once (seriously, though). Use glue in every step. Read through all the instructions before you begin. Use 1 1/4" screws or 1 1/4" Kreg Jig screws unless otherwise indicated. Pre-drill and countersink all your screws. Be safe, have fun, and let me know if you have any questions!
Shopping List:
1 - 2x2 @ 8'
1 - 2x2 @ 4'
1 - 1x6 @ 10
1 - 1x6 @ 8'
1 - 1x2 @ 8'
1 - 1x8 @ 8'
1 - 1x8 @ 4'
1 - 1x12 @ 6'
1 - 1x12 @ 4'
1 - 1x4 @ 4'
1 - sheet 3/4" plywood
3 sets 18" full extension drawer slides
4 - drawer pulls
1 - mini drawer pull (for the pull-out)
Kreg Jig
1 1/4" Kreg Jig pocket hole screws
1 1/4" wood screws
finishing nails
Wood glue
sandpaper and finishing supplies

Cut List:
(A) 6 - 2x2 @ 29" (legs)
(B) 3 - plywood @ 17 3/4" x 22 1/2" (sides)
(C) 1 - plywood @ 24 x 22 1/2" (left back)
(D) 1 - plywood @ 12 1/2" x 22 1/2" (right back)
(E) 1 - 1x6 (trimmed) @ 24" (knee trim)
(F) 3 - 1x2 @ 12 1/2" (drawer trim)
(G) 1 - 2x2 @ 12 1/2" (drawer trim bottom)
(H) 3 - plywood @ 10 x 17 3/4" (drawer bottom)
(I) 6 - 1x6 (trimmed) @ 17 3/4" (drawer side)
(J) 3 - 1x6 (trimmed) @ 11 1/2" (drawer back)
(K) 3 - 1x6 @ 12 1/4" (drawer front)
(L) 2 - 1x2 @ 17 3/4" (pull-out support)
(M) 1 - plywood @ 12 1/4" x 20" (pull-out)
(N) 1 - 1x2 @ 8 3/4" (pull-out stop)
(O) 3 - 1x8 @ 42" (top)
Hutch Cut List:
(P) 1 - plywood @ 38 1/2" x 13 3/4" (hutch back)
(Q) 2 - 1 x12 @ 13 3/4" (hutch sides)
(R) 1 - 1x12 @ 41" (hutch top)
(S) 1 - 1x12 (trimmed) @ 13 3/4" (hutch divider) -OR- plywood cut to size
(T) 3 - 1x12 (trimmed) @ 12 1/2" (hutch shelves) -OR- plywood cut to size
(U) 1 - plywood @ 10 3/4" x 9" (drawer bottom)
(V) 2 - 1x4 @ 9" (drawer sides)
(W) 2 - 1x4 @ 12 1/4 (drawer front/back)
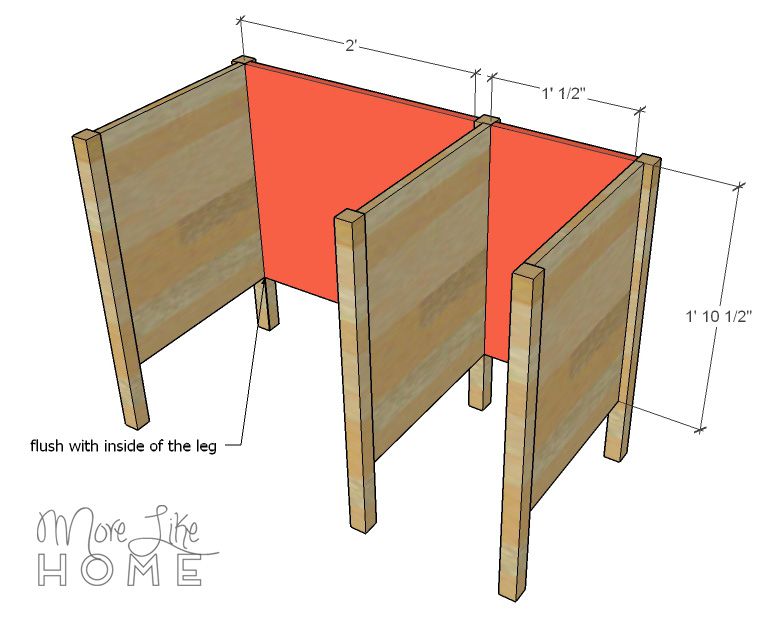
Start by building three leg sections. Attach two legs (A) to each side piece (B). Use a Kreg Jig to make pocket holes along the side and top edges of the side boards, and use Kreg screws to attach the sides to the legs. Keep the inside face of the side board flush with the inside face of the legs.
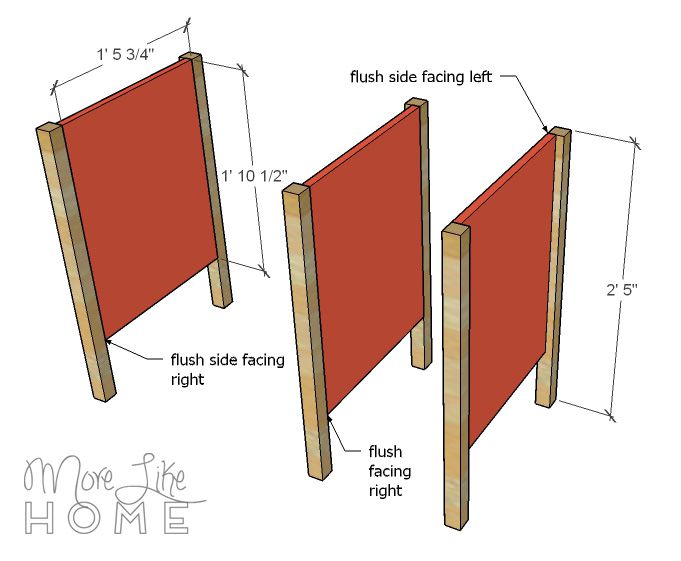
Connect the leg sections with the back left (C) and back right (D) boards. Make sure the leg sections are facing the right way! The left and right sections should have the flush sides facing in, and the center section should have the flush side facing right. Put pocket holes along the sides and top of each back board, then attach them with kreg screws. Keep these boards flush with the inside edge of the legs.
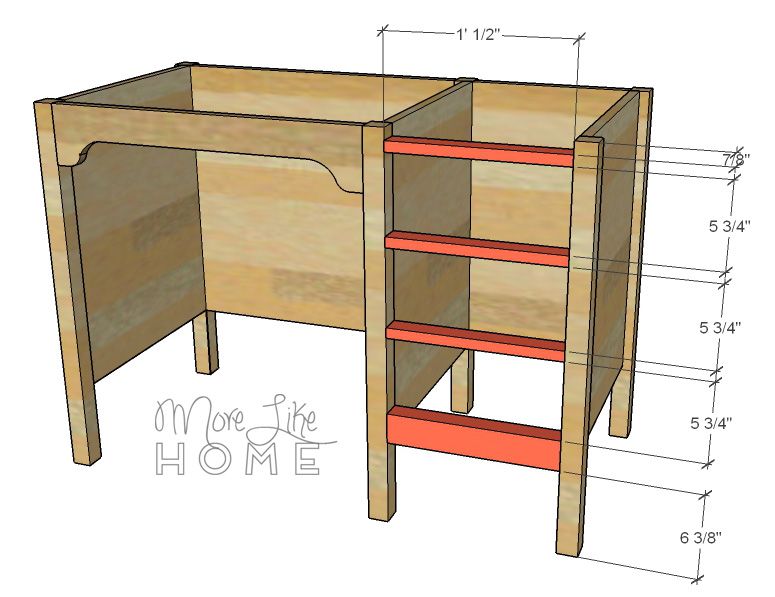
Add the knee trim (E) across the top of the left opening. I've drawn it as a 1x6 trimmed down to 4 1/2" wide, then use a jigsaw to cut a simple decorative edge. You can also take a much simpler path and use a 1x2 or 1x3 straight across without the decorative edge. No sweat. Drill pocket holes in the ends and top of the trim piece and install it with the Kreg screws.

Next install the drawer dividers (F) and bottom trim (G). Make sure these are level, and attach them by drilling pocket holes in each end and install them with Kreg screws. The first divider should be set down 7/8" from the top of the desk, and the remaining dividers should each be spaced 5 3/4" from the divider above it (it should leave 6 3/8" space below the bottom trim).
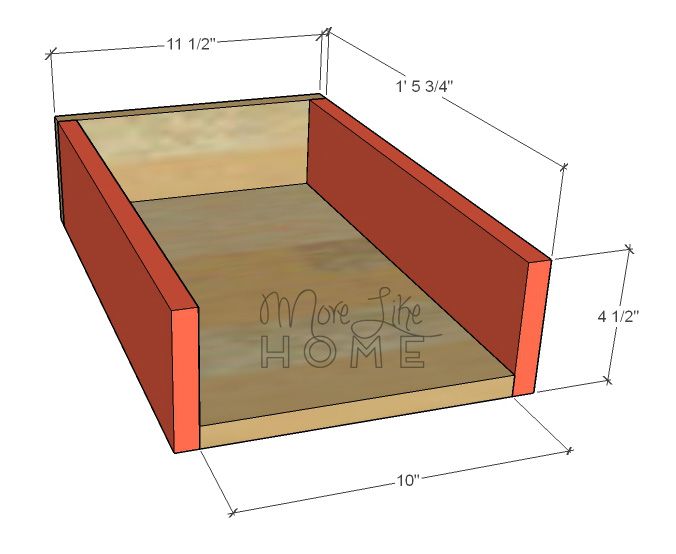
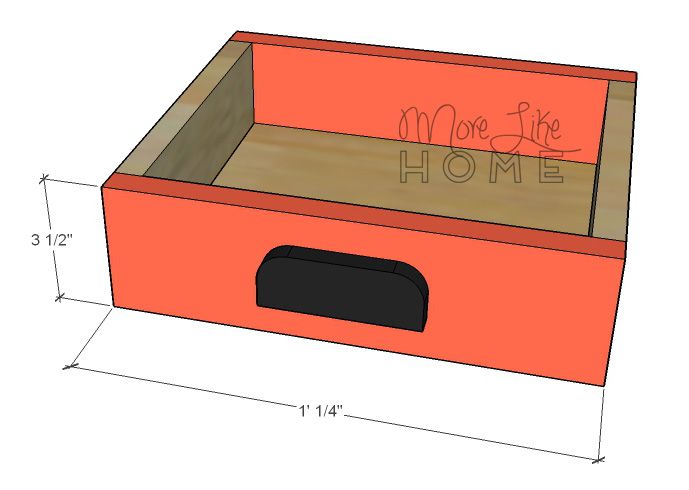
Make some drawers! Three of them. Start by trimming the drawer sides (I) and backs (J) to 4 1/2" tall (you could save some cutting and use 1x4s instead, but the drawers will end up pretty shallow). Drill pocket holes around all four sides of the drawer bottom (H) and along the front and back ends of the drawer sides (I). Attach the drawer sides to the drawer bottom using the pocket holes in the bottom board. Then attach the back using the pocket holes in the drawer bottom and sides.
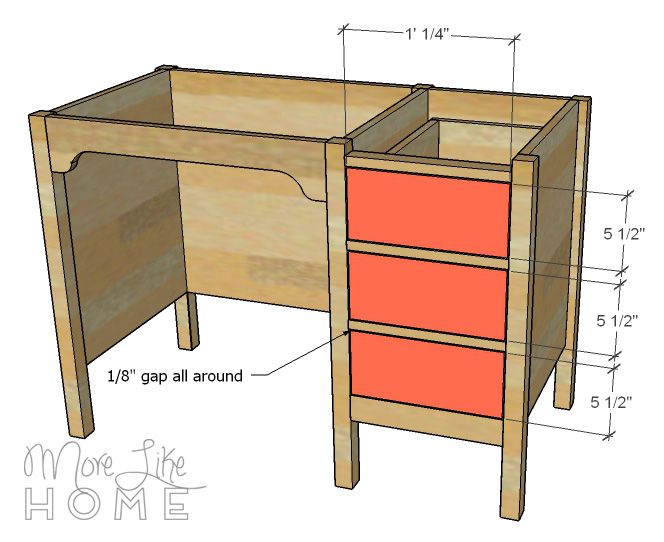
Follow the instructions on your drawer slides to install the drawer boxes. Make sure the boxes are set back 3/4" from the face of the desk (so when you add the drawer fronts they will be flush).

Center a drawer front (K) over each drawer box with a 1/8" gap all around and attach it to the box with glue and a few finishing nails. Pull the drawer out and use the pocket holes in the sides and bottom to reinforce the bond.
Next install the pull-out work surface. Note that this is not a load-bearing surface, but like a vintage desk adds a great extension to the workspace for writing or spreading out paperwork. Install the pull-out supports (L) along each side of the drawer space, flush with the drawer divider trim (make sure the supports are level). Flip the pull-out (M) upside down and add the pull-out stop (N) flush with the back edge, and centered with 1 3/4" space on either side. The stop will prevent the pull-out from pulling-all-the-way-out. If you have a router, you can cut a long notch near the front edge to create a finger-pull for gripping the board to slide it out. If not, just add a tiny drawer pull to the front.
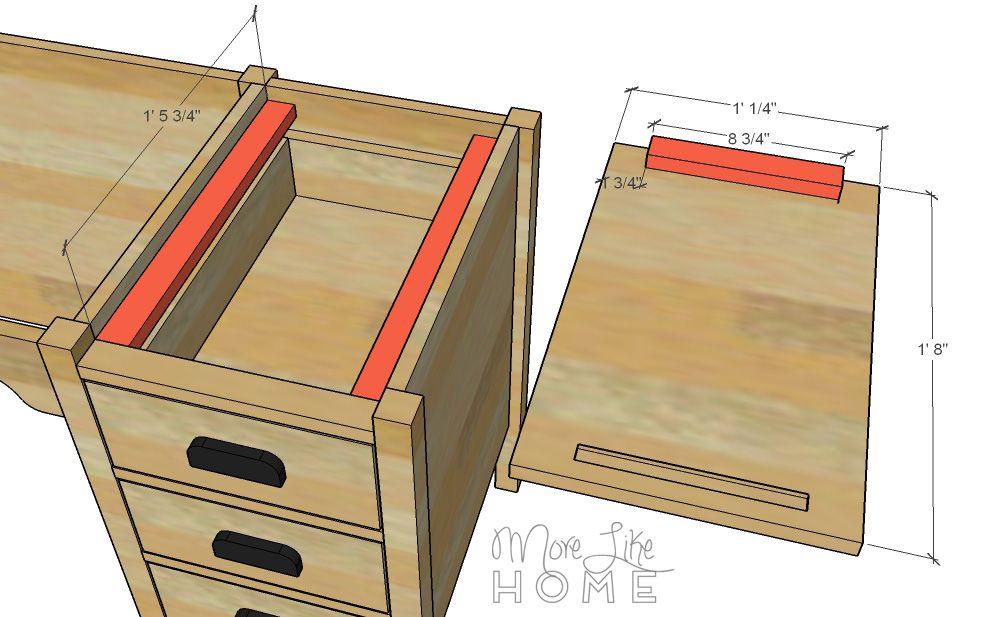
Flip the pull-out right side up and set it in place over the drawer stack.

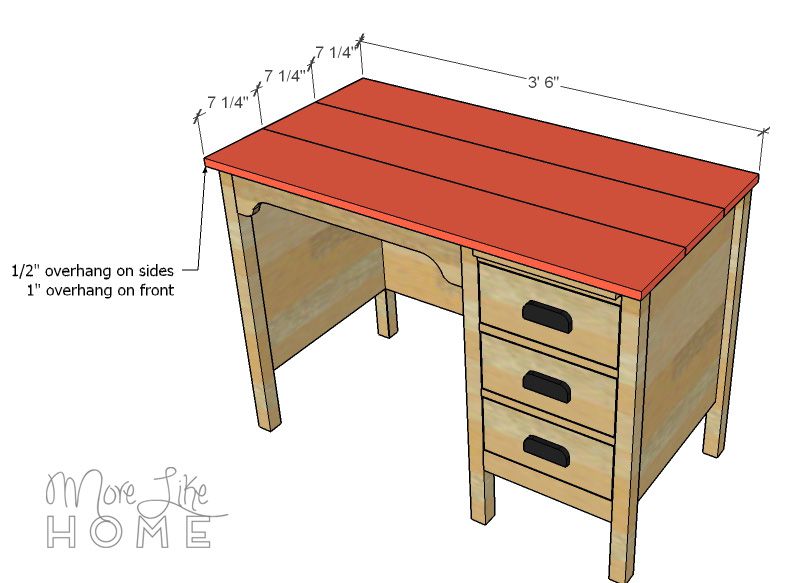
Check your desk for square, then install the top boards (O).
To check for square, measure across the top of the desk from corner to corner (basically making an X across the desk with the tape measure). If those two measurements match, your desk is square. If not, do your best to shift and shimmy the desk and get them even.
Flip the top boards upside down and lay them side-by-side. Use pocket holes along both sides of the center board to attach it to the other two boards. Then flip the top right-side-up and place it on the desk with a 1/2" overhang on the sides and 1" overhang on the front.
To build the hutch, start by attaching the hutch back (P) to the hutch sides (Q). Drill pocket holes along the sides, top and bottom of the hutch back, and along the top and bottom of the sides. Use the pocket holes along the ends of the back board to attach it to the sides.

Attach the hutch top (R) using the pocket holes and Kreg screws (you could use finishing nails instead if you won't want any holes to fill around the top).

Install the hutch divider (S). Use the Kreg Jig to build pocket holes along the top, bottom, and back of the divider. Then attach it to to the top and back boards with Kreg screws. Make sure there is a 12 1/2" space on the right side of the divider.

Install the hutch shelves (T). Use pocket holes along the sides and back of each shelf. The bottom shelf should be flush with the bottom of the hutch, the next shelf should be set up 3 3/4", and the next one can be wherever you want (I've drawn it spaced up 3 1/2" but you could even omit that shelf to fit taller items.

Next build the tiny little hutch drawer. Drill pocket holes along all four sides of the drawer bottom, and along the front and back edges of the side boards (or just do this little guy with finishing nails because it's easier and you won't have much a load to worry about). Attach the drawer sides (V) to the drawer bottom (U).

Attach the drawer front and back (W).
To finish the desk, fill any holes with wood filler then sand everything down really well. This is the most important step for a professional finish! Start with a rough sand paper, then go over everything with a medium paper, then again with a fine paper. Once it's super smooth, finish it with whatever paint or stain and sealer you like. Don't forget to add the drawer pulls.
I'm loving the two-tone look of a white desk with a stained top!
Or keep it classic with a deep, rich stain.

That's it! Come back tomorrow for another DIY desk plan, and check out the full series here!
)
I made this. Turned out awesome.. Thank you for your help!! I love the easy to follow directions.
ReplyDeleteThat's great! Thanks so much for letting me know!! :)
DeleteHello! I want to make this hutch for my sewing station but how am I supposed to attach the Desk top made from the three boards to the final base structure?
ReplyDeleteHi! One option is to use a Kreg Jig to make pocket holes along the top edge of the sides and back of the desk and use those to attach the top with 1 1/4" pocket hole screws. The other option is to drill down through the desktop boards into the side and back boards with 1 1/4" wood screws (with this option you'll need to fill the screw holes with wood filler, whereas with the Kreg Jig all the holes will be hidden underneath and not visible). Hope that helps! :)
DeleteAlso keep in mind if you are staining your desktop, the wood filler won't take the stain quite the same way the wood does and will likely be a slightly different color. Not a big deal, but if that bothers you you'll definitely want to use the Kreg Jig. :)
Delete